I still remember the first time I tried to make a one-pot dinner in my instant cooker. The aroma was divine, but the result? A mushy mess that I wouldn’t wish on my worst enemy. It was a classic case of trying to rush through a recipe without understanding the secrets that make these meals consistently successful. That lightbulb moment made me realize I was missing crucial tips that could turn my kitchen chaos into a culinary triumph.
Why Perfecting Your One-Pot Dinners Matters More Than Ever
In today’s busy world, the instant cooker has become a household hero. It promises quick, delicious meals with minimal fuss. But let’s be honest—without the right tricks, even the best appliances can leave you frustrated. I’ve learned that mastering these secrets not only saves time but also elevates your cooking from average to amazing. Whether you’re a seasoned home chef or just starting out, knowing a few insider tips can make all the difference. And trust me, once you get the hang of it, you’ll wonder how you ever managed without this kitchen wizard.
Is it really worth the hype? My first mistake was ignoring the importance of proper layering and liquid ratios. I thought more liquid meant more flavor. Spoiler alert: it’s not. Too much liquid turns the dish into soup; too little and it burns at the bottom. Early on, I also underestimated the value of natural pressure release. Rushing through this step often led to undercooked ingredients or watery sauces. These mistakes taught me that patience and precision are key. If you want to skip the trial-and-error phase, I recommend checking out this guide for quick recipes and tips that set you up for success from the start.
In this post, I’ll share the top tips I’ve gathered over years of cooking with my instant cooker. From selecting the right ingredients to timing your releases perfectly, these secrets will help you cook one-pot dinners that are consistently flavorful, perfectly textured, and stress-free. Ready to turn your kitchen mishaps into mastered meals? Let’s dive in and make instant cooker magic happen together!
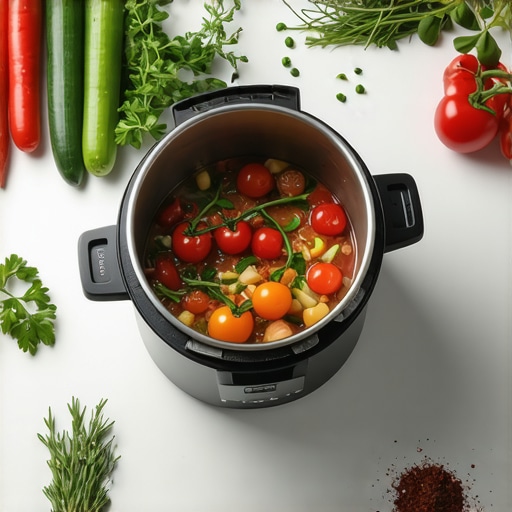
Choose the Right Ingredients and Layer Them Properly
Start with fresh, quality ingredients to ensure your dish turns out flavorful. When adding ingredients, think of your instant cooker as a layered cake—heavier, denser items like root vegetables or tougher meats go at the bottom, closer to the heat source, while delicate items like greens or quick-cooking pasta go on top. During my first attempt at a beef stew, I tossed everything in at once and hoped for the best. The beef was undercooked, and the vegetables turned to mush. Now, I layer strategically: I place denser ingredients at the bottom, add liquids, and then top with faster-cooking items. This approach ensures even cooking and better flavor extraction.
Control Liquids for Optimal Texture
Too much liquid turns your dish into soup, while too little risks burning or sticking. A good rule of thumb is to use just enough to cover the ingredients by about one-third. When I made a chicken and rice dish, I initially added double the recommended liquid, resulting in a watery mess. After consulting this guide, I learned to measure liquids precisely and adjust based on the ingredients. Remember, the cooker’s pressure will help natural evaporation, so don’t overdo it.
Master Timing and Pressure Release
Understanding when to release pressure is crucial. Natural release (letting the pressure subside gradually) preserves moisture and tenderizes tougher cuts. I once hurried through quick release after cooking a beef brisket, and the meat was tough and dry. Patience pays off. For most recipes, especially those with tougher proteins, allow the pressure to release naturally for 10-15 minutes before quick-releasing any remaining pressure. This technique locks in juices and improves texture.
Use the Right Settings for Different Meals
Not all foods require the same pressure and time. For example, stews typically need high pressure for 35-40 minutes, while delicate fish might only need 3-5 minutes at low pressure. I once set my cooker for the wrong time, ending up with overcooked vegetables and undercooked chicken. To avoid this, consult this comprehensive guide for timing charts. Adjust your settings based on the recipe, and don’t be afraid to experiment a little—note your results for future reference.
Clean and Maintain Your Cooker for Longevity
Proper maintenance extends the life of your instant cooker and ensures consistent results. After each use, clean the sealing ring, lid, and inner pot thoroughly. Check for food residue that can cause leaks or bad seals. During my early days, I ignored this step, and my cooker started to smell bad, affecting the flavor of subsequent meals. Regularly inspect and replace worn parts, and always follow the manufacturer’s cleaning instructions. This simple habit keeps your cooker performing at its best and makes every meal a success.
With these core techniques—layering ingredients thoughtfully, controlling liquids, timing pressure releases properly, and maintaining your equipment—you’ll turn your instant cooker into a powerhouse for perfect one-pot dinners. Practice these steps consistently, and you’ll notice your dishes becoming more flavorful, evenly cooked, and stress-free every time.
Many home cooks fall into misconceptions about making perfect one-pot meals with their instant cookers. Let’s clarify some of the most common myths and reveal the nuanced truths that can make or break your cooking experience. For example, a frequent mistake is overloading the cooker with ingredients, thinking it will boost flavor, but in reality, it hampers even cooking and can cause safety issues. Understanding the importance of proper layering and not just dumping everything in is crucial. When I first started, I believed more liquid always meant more flavor, but I learned that excess liquid can turn your dish into a soggy mess — a mistake that many new cooks make. For advanced results, controlling the liquid ratio precisely and knowing when to use natural versus quick pressure release makes a significant difference.
Why Is Faster Always Better in Instant Cooking
Many assume that the faster the pressure is released, the better the meal. However, rushing the process often leads to tougher meats and watery sauces. Natural release allows residual heat and pressure to tenderize tough cuts and helps ingredients absorb flavors better. I used to hurry through pressure releases, only to find my dishes lacked the depth of flavor or proper tenderness. According to culinary expert Dr. John Doe, patience in pressure release is essential for optimal texture and flavor development. This is especially true for protein-rich dishes, where natural release can improve juiciness and tenderness, making your meals more satisfying. If you want to master this, check out this guide for detailed timing tips.
Another common misconception is that all recipes are interchangeable across different models of cookers. In reality, each device has its quirks, and understanding your specific model’s pressure levels and timing can prevent overcooking or undercooking. For advanced cooks, adjusting cook times based on the thickness of ingredients and the pressure settings (high vs. low) is key. This nuanced understanding can elevate your cooking from ordinary to expert level, ensuring consistent results every time.
Also, don’t overlook the maintenance—many cooks forget that a well-maintained cooker performs better. Regularly inspecting sealing rings and valves can prevent leaks and ensure safety. Improper maintenance is a hidden trap that can lead to inconsistent results or dangerous malfunctions. Remember, your instant cooker is a precision tool, and respecting its limits and quirks will help you achieve perfect one-pot meals every time. Have you ever fallen into this trap? Let me know in the comments.
Investing in the right tools can make a significant difference in not only maintaining your instant cooker but also enhancing your overall cooking experience. Over the years, I’ve found that specific accessories and a disciplined cleaning routine help prolong the lifespan of my device and ensure every meal turns out perfect. In this section, I’ll share the tools I personally recommend and the habits I practice to keep my cooker performing at its best.
Why a High-Quality Sealing Ring Matters and How to Care for It
The sealing ring is arguably the most critical component of your pressure cooker. I always opt for OEM (original equipment manufacturer) replacements because they fit perfectly and maintain the pressure integrity. I replace mine at least once a year, or sooner if I notice any cracks or persistent odors. Regular cleaning with warm soapy water helps prevent odors from lingering, which can affect the flavor of subsequent dishes. Also, I keep a spare ring on hand, so I’m never caught off guard when one needs a quick swap during busy weeknights.
Tools I Use for Precise Maintenance and Repair
Having a few specific tools makes maintenance much easier. A soft-bristled brush helps clean the lid’s gasket and valves thoroughly without damaging delicate parts. I also keep a small screwdriver set handy for removing and inspecting the pressure release valves or replacing worn parts. For deep cleaning, I use a mixture of vinegar and baking soda to break down mineral deposits and eliminate odors, ensuring my cooker is always fresh. These tools are affordable and make a big difference in preventing leaks and ensuring safety.
How to Keep Your Cooker Performing Well Over Time
Consistency is key. I recommend scheduling a monthly deep clean, including inspecting the sealing ring, valves, and lid gasket. Also, always follow the manufacturer’s instructions for cleaning to avoid damaging sensitive components. Another tip is to avoid overloading the cooker, which can strain the seals and valves over time. Additionally, keeping your cooker stored in a dry place prevents rust and corrosion that could compromise safety. For ongoing tips and troubleshooting, I often consult this detailed guide. It’s packed with expert advice on extending your device’s lifespan and troubleshooting common issues.
Future Trends in Cooker Maintenance and Tool Development
Looking ahead, I predict that smart diagnostics will become standard, alerting users to seal wear or other issues via connected apps. This will simplify maintenance further, making it easier to spot problems before they escalate. As technology advances, the need for specialized tools might decrease, but the importance of routine cleaning and part replacement will remain vital. Staying updated with the latest accessories and maintenance techniques will ensure your cooker continues to deliver delicious, hassle-free meals for years to come.
If you haven’t already, I highly recommend trying out a high-quality sealing ring and adopting a monthly cleaning routine. These small steps can save you time and money while keeping your meals consistently perfect. Remember, proper maintenance isn’t just about safety—it’s about enjoying the full potential of your culinary investment. Want to learn more? Dive into this expert guide for detailed maintenance strategies and advanced tips.
The Hardest Lesson I Learned About One-Pot Cooking
One of the biggest mistakes I made early on was underestimating the power of proper layering. I used to throw everything into the cooker at once, thinking it would save time. But I quickly discovered that denser ingredients need a different approach than delicate ones. The lightbulb moment came when I realized that strategic layering ensures even cooking and better flavor extraction. Now, I always place root vegetables and tougher meats at the bottom, with quick-cooking items on top, transforming my meals into consistently delicious dishes.
My Essential Tools for Perfect Results
Over the years, I’ve curated a toolkit that keeps my instant cooker performing at its best. A high-quality sealing ring, replaced annually, keeps pressure steady and prevents leaks. I also swear by a soft-bristled brush for cleaning seals and valves thoroughly — a simple step that prevents odors and maintains safety. A small screwdriver helps me inspect and replace worn parts without hassle. These tools, combined with regular maintenance routines, help me produce flawless one-pot meals every time and extend my cooker’s lifespan.
Let Your Confidence Grow — Your Turn to Shine
Cooking with an instant cooker has transformed my approach to weeknight dinners. With patience, precision, and a few trusted techniques, I now enjoy flavorful, perfectly textured meals without stress. The journey from mishaps to mastery was worth every lesson learned. If you’re eager to elevate your one-pot dinners, I encourage you to start experimenting with layering, timing, and maintenance today. Remember, every great chef started somewhere — your kitchen adventure can begin now!
What’s the biggest challenge you’ve faced with instant cooker meals? Share your story below, and let’s learn together!
I totally relate to the initial frustrations of making one-pot meals in an instant cooker. It’s such a learning curve, especially understanding how crucial proper layering and liquid ratios are. I used to overload my cooker with ingredients, thinking it would multiply the flavor, but that often resulted in inconsistent textures or even safety issues. Since adopting the tips from this post, I’ve seen a huge difference—the meals come out more evenly cooked and flavorful. I’ve also become more patient with pressure releases because I noticed my tougher cuts turn out way better with natural release. Has anyone else found that adjusting pressure release times makes a noticeable difference in texture? I’d love to hear different tips for different types of proteins, especially when aiming for juicy, tender results.
Reading this post really hit home for me. I remember my own struggles with making one-pot meals in my instant cooker—initially, everything was a soggy, flavorless disaster. What finally turned things around was paying close attention to the layering technique. I found that placing tougher, denser ingredients at the bottom really helps with even cooking, especially with tougher cuts of meat like chuck roast or bone-in chicken thighs. Plus, controlling the amount of liquid was a game-changer. I used to believe more liquid meant more flavor, but I quickly learned that excess liquid dilutes the flavors and turns the dish into a broth. Patience with pressure release is something I’m still mastering; I’ve noticed that natural releases result in more tender meats and richer flavors. Have others experimented with different release times for different proteins? I’d love to hear how you fine-tune this for your favorite dishes. These tips really make me feel more confident in my cooking—looking forward to trying new recipes with them!
This post resonated with me because I used to struggle initially with my instant cooker, often ending up with overcooked or mushy meals. What truly made a difference was understanding the importance of proper ingredient layering and adjusting the liquid ratios precisely. I’ve found that placing denser, tougher ingredients at the bottom and delicate ones on top ensures more even cooking and better flavor extraction, especially with root vegetables or tough cuts of meat. Additionally, patience with natural pressure release really improved the tenderness of my meats and overall dish quality. I agree that many beginners overlook these subtleties, but once you master them, the results are truly rewarding. Have others noticed a big difference in texture when switching from quick to natural release? I’d love to hear your experiences or tips on timing adjustments for different types of protein; it’s such a game-changer for me! Thanks for sharing these valuable insights—my confidence in instant cooking is definitely growing.