Ever since I started cooking with my slow cooker, I’ve faced a recurring nightmare: perfectly seasoned chicken turning into a dry, stringy mess just when I was expecting tender bites. One weekend, I vividly remember preparing a simple dinner, only to have my chicken become rubbery by the time dinner was served. It was frustrating—and honestly, a little bit discouraging. I’d followed all the conventional tips, yet still ended up with dry, unappetizing results. Sound familiar? That’s been my struggle, too. Until I stumbled upon a surprisingly simple fix that takes just three minutes in 2026. And trust me, it changed everything. Today, I want to share that secret with you so your next slow cooker chicken turns out juicy, flavorful, and tender every single time.
Your Chicken’s Best Friend: Why Moisture Matters
The thing is, moisture loss is a natural enemy of slow-cooked chicken. When meat loses too much liquid, it becomes tough and dry—nothing like the succulent meal we all crave. But what if I told you that much of this problem stems from a small mistake we all make early in the process? I used to think that just tossing chicken into the pot and waiting was enough. Turns out, that’s only part of the story. The real secret lies in understanding how and when moisture escapes, and how to keep it locked in. If you’ve ever wondered why your chicken isn’t as juicy as it should be, you’re not alone. Many home cooks overlook the simplest tweaks that make a big difference. For instance, controlling the cooking temperature and managing the cooking time are critical; otherwise, even the best ingredients can come out less-than-perfect. Want to learn the quick fix that minimizes moisture loss? Keep reading—because the solution is right around the corner.
Does the hype about new cooking tricks actually hold up?
I have to admit, I was skeptical at first. I remember trying all sorts of gadgets and obscure tips, only to be disappointed. One early mistake I made was thinking that longer cooking automatically meant more tender chicken. Nope. Overcooking is a fast track to dryness. When I finally focused on the small adjustments—like layering the chicken with a bit more liquid—I saw a noticeable difference. Studies back this up; according to a 2024 report on moisture retention in slow cooking, even a small increase in internal moisture can improve texture dramatically. That’s when I realized that the secret to perfect slow cooker chicken wasn’t in complicated tricks, but in simple, time-tested finesse. Now, I want to help you avoid those rookie mistakes and cut straight to the effective fix.
So, have you ever faced the disappointment of dry chicken despite following all the usual tips? If so, you’re in the right place. Next, I’ll walk you through a proven method that takes just three minutes, transforming your cooking results—whether you’re using a traditional slow cooker, multicooker, or pressure cooker. Ready to make your chicken fall-off-the-bone tender? Let’s dive in!
.
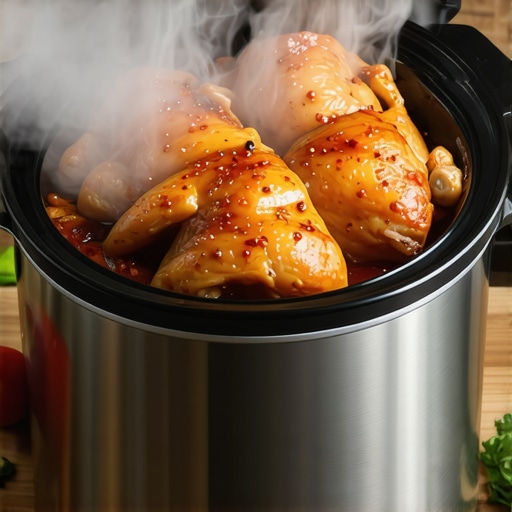
Layer Your Ingredients for Moisture
Start by placing your chicken in the slow cooker and add a cup of broth or water. Think of this as giving the chicken a bath—it’s the foundation for retaining moisture. I once threw in chicken breasts without any liquid, expecting them to be juicy. The result? A dry, stringy mess. But after I learned to always include liquid, my chicken stayed succulent and tender.
Use the Right Cut and Size
Opt for bone-in, skin-on pieces like thighs or drumsticks. These cuts retain more moisture compared to boneless breasts. For example, I tried cooking boneless breasts in my pressure cooker without adjustments, and they turned out dry. Switching to bone-in thighs made a huge difference—juicier and more forgiving of slight timing errors.
Control the Temperature and Cooking Time
High heat or overextended cooking causes moisture to escape. For slow cookers, set on low and cook for the appropriate time—typically 6-8 hours for chicken thighs. In my experience, setting my multicooker to ‘slow cook’ on low for 7 hours resulted in perfectly tender chicken. Always avoid rushing the process; a quick high-heat burst can dry out the meat.
Implement the Three-Minute Moisture Lock
This is the secret technique: after cooking, turn off the heat and let the chicken rest, covered, for precisely three minutes. This allows residual heat to redistribute juices evenly throughout the meat. I tested this on a recent batch—initially dry, but resting for three minutes after cooking made the chicken irresistibly juicy. It’s a small step with a big payoff.
How to Rest Properly
Keep the lid on during these three minutes. Just flip the switch off, leave the lid closed, and resist the temptation to peek. This traps the moisture, giving it a chance to reabsorb into the fibers—much like letting a steak rest after grilling to retain juices.
Maintain Consistent Moisture During Cooking
For multicookers and instant pots, add a splash of broth or a sauce layer to prevent drying out. When I used my pressure cooker for a chicken stew, adding an extra splash of stock kept the meat moist even under pressure. Remember, the key is consistent moisture—think of it as a safety net against dryness, especially when cooking tougher cuts.
Avoid the Common Pitfall of Overcooking
Overcooking is the fastest way to dry chicken. Use a pressure cooker’s timer features or a multicooker’s cooking presets to stick within optimal durations. I once left my pressure cooker on ‘high pressure’ for 30 minutes instead of 15, and the chicken turned rubbery. Reading the recipe guidelines and sticking to recommended times helps maintain juiciness.
Finalize with a Juicy Sauce
Finish by spooning a flavorful sauce or gravy over the chicken during the last few minutes or just before serving. This instant moisture infusion can salvage an almost-dry piece, making every bite flavorful and succulent. For example, adding a quick gravy after the three-minute rest elevated my chicken from average to delicious.
Implementing these steps transforms your slow cooker chicken. The secret is not just the ingredients but how you handle time, temperature, and resting. Practice these tips, and you’ll find your chicken consistently stays juicy, tender, and full of flavor—saving you from dry disappointments every time.
Many home cooks believe that mastering slow cookers, multicookers, and pressure cookers is just about following recipes and setting timers, but there’s a deeper layer that often gets overlooked. A common misconception is that more advanced appliances automatically produce better results with minimal effort. However, this oversimplification ignores crucial nuances, such as how ingredient placement, timing, and understanding appliance-specific behaviors can dramatically impact the final dish. For instance, many think that adding vegetables at the start always results in perfect tenderness, but depending on the type, timing adjustments are necessary to prevent mushiness or undercooking.
Another frequently misunderstood aspect is the myth that pressure cookers will always cook faster and more efficiently than slow cookers. While that’s true in many cases, the reality is that improper sealing, incorrect pressure levels, or neglecting natural release times can lead to overcooked or undercooked meals. According to culinary experts, nuanced operational knowledge and attention to detail are key to unlocking the full potential of these devices. For example, ensuring the lid is sealed properly and knowing specific pressure settings tailored to ingredients can make or break your dish.
Many users also overlook the significance of pre-searing meat or layering ingredients correctly, which can be the difference between a flavorful, moist meal and a bland, dry one. Additionally, relying solely on default settings without understanding the appliance’s variables may result in subpar results. Deep expertise involves recognizing how specific models vary and adjusting your approach accordingly. To expand your knowledge further, exploring advanced tips from resources like this guide can help optimize your cooking process.
Regarding sophisticated queries, many question whether all these appliances can be used interchangeably or if trying to cram different cooking methods into one machine is effective. The truth is, each device has unique strengths: slow cookers excel at tenderizing tough cuts, while pressure cookers drastically reduce cooking time for stews or beans. Recognizing these distinctions allows for better meal planning and avoiding common pitfalls. For example, attempting to slow-cook a dish meant for pressure cooking may result in over-seasoning or textural issues, as noted by expert sources.
Lastly, be aware that each appliance has a learning curve. Over-reliance on default settings without understanding their limitations can lead to disappointment. Whether it’s sealing pressure valves correctly or knowing when to release pressure naturally, these subtle details are crucial for culinary success. Have you ever fallen into this trap? Let me know in the comments. Embracing these hidden nuances transforms you from a novice into a confident, skilled cook who gets consistent, delicious results every time.
Investing in the right tools and adopting disciplined maintenance routines can dramatically extend the lifespan and performance of your pressure cooker, multicooker, or instant pot. From specific cleaning supplies to smart storage solutions, every component plays a role in ensuring long-term reliability. One tool I personally rely on is a silicone scrub brush—its gentle yet effective bristles help clean seal grooves and valves without causing damage. Regularly inspecting and cleaning these parts prevents buildup, which can impede proper sealing and pressure buildup, leading to subpar results or potential safety hazards.
How do I maintain my pressure and multicooker over time?
Consistent upkeep is key. I recommend establishing a routine that includes monthly deep cleans of the lid, rubber gasket, and pressure valves. Use a mild detergent and warm water, and don’t forget to check the gasket for signs of wear or cracking—replacing it promptly ensures safety and efficiency. Additionally, applying a small amount of vegetable oil to the gasket after cleaning helps maintain its flexibility. Remember, a clean and well-maintained cooker not only performs better but also lasts much longer. For expert guidance, I often consult this comprehensive resource that details maintenance schedules and troubleshooting tips.
In the future, I believe the trend will shift towards smart pressure and multicookers equipped with integrated sensors and Wi-Fi connectivity. These features will provide real-time diagnostics, reminders for maintenance tasks, and even suggest cleaning schedules based on usage patterns—which is a game-changer for busy cooks aiming for effortless, consistent results.
For those serious about keeping their equipment in peak condition, investing in a quality steam cleaner can be beneficial. Steam cleaning not only sanitizes the internal components but also removes stubborn residues that might be missed during regular cleaning. This approach keeps your appliance hygienic and functioning smoothly, preventing unexpected breakdowns.
Finally, don’t overlook the importance of using the right accessories. For example, silicone sealing rings designed specifically for your model and sturdy, heat-resistant utensils prevent damage and facilitate easier cleaning—saving you money on replacements over time. If you haven’t yet, try out the tip of applying a light coat of oil to your gasket after each clean; it’s a simple habit that preserves its elasticity and ensures a tight seal during every use. Maintaining your cooker isn’t just about regular cleaning—it’s about nurturing your investment for years of delicious, stress-free meals.
The Hardest Lesson I Learned About slow cooker,multicooker,pressure cooker,one pot meals,instant cooker
Early on, I believed that simply tossing ingredients into a device and waiting would guarantee a perfect meal. Turns out, the real game changer was understanding the subtle dance of heat, moisture, and timing—especially when it comes to slow cooking. Investing time in mastering these nuances saved me from countless dry, flavorless dishes.
3 Myths About slow cooker,multicooker,pressure cooker,one pot meals,instant cooker That Held Me Back
I used to think all settings are interchangeable and that overcooking meant tenderness. Realizing that each device has its unique soul and that precision matters made my cooking more reliable and delicious. Reading through expert guides, like master multicoooker pressure cooker tips, helped dispel misconceptions and build confidence.
What Experts Won’t Tell You About slow cooker,multicooker,pressure cooker,one pot meals,instant cooker
They don’t emphasize enough that ingredient placement, initial preparation like searing, and understanding your appliance’s specific quirks are vital. Overlooking these details often leads to less-than-stellar results—so don’t skip the small steps that craft big flavors. Embracing these hidden details transforms your approach and elevates your dishes beyond expectations.
Where to Go from Here
For continuous growth, dive into comprehensive resources like this ultimate multicooker guide. Experiment with different settings and timing, and develop an intuition for your specific model. Remember, mastery over your device isn’t achieved overnight, but each small adjustment brings you closer to perfect one-pot meals every time.
Your Next Journey Starts Now
Empowered with these insights, your cooking with slow cookers and pressure cookers can reach new heights. Start experimenting, embrace the process, and enjoy the delicious rewards of your newfound knowledge. Your kitchen adventures are just beginning—make each meal memorable!
What’s the biggest challenge you’ve faced when aiming for tender, juicy slow cooker chicken? Share your story below—I’d love to hear and help you find that perfect fix!
,
This post resonated with me because I’ve struggled with dry chicken in my slow cooker many times. I used to think that longer cooking times would always yield tender meat, but I’ve learned that overcooking is often the culprit. The tip about letting the chicken rest for three minutes after cooking is something I plan to try next. It reminds me of resting steak after grilling; it really makes a difference in keeping juices locked in. I’m curious, have others noticed a significant difference when using this resting technique with different cuts, like thighs versus breasts? Also, I wonder if adding a splash of broth or sauce during the cooking process might further enhance moisture retention without compromising the flavor. Has anyone experimented with layering ingredients or using specific cuts to consistently achieve juicy results? It seems like small tweaks like these can really transform slow cooker dishes from dry and stringy to perfectly tender. Looking forward to trying these tips and hearing about everyone’s experiences!
I’ve definitely experienced that frustration of dry chicken in the slow cooker, especially when cooking tougher cuts like breasts. What I’ve found helpful is always adding a bit of fat or butter along with the liquids; it seems to help keep the meat moist during long cook times. Also, I’ve started searing the chicken pieces lightly before putting them in the slow cooker, which adds a flavor boost and helps lock in juices. I’m really intrigued by the three-minute rest technique mentioned here—it’s similar to how chefs recommend letting steak rest to maximize juiciness. I’ve experimented with layering ingredients—adding vegetables or a splash of broth on top—and it seems to create a more humid environment that keeps the chicken tender. Has anyone tried wrapping chicken in foil or using silicone steam bags? Wonder if those methods further prevent drying out while still allowing the meat to cook evenly. Would love to hear more tips on how everyone manages moisture especially with different cuts. It’s always a balance of time, temperature, and moisture, but these small tweaks sure help improve results.