I can’t count how many times I’ve watched a batch of chicken in my slow cooker turn into an unappetizing, dry mess—despite following what I thought were the right recipes. There was a lightbulb moment when I realized the common mistake: I was neglecting to properly manage the moisture levels. It felt like the chicken was fighting me every step of the way, going from tender to tough in an instant. Have you ever experienced that frustrating dry-out, only to wonder where you went wrong? If so, you’re not alone—and it turns out, the solution might be simpler than you think.
The Power of Liquid: Mastering Moisture in Your Slow Cooker
For years, I’ve been on a quest to perfect my slow-cooked chicken, and after much trial, error, and a fair share of burnt hands from opening lids too early, I discovered a game-changing principle: the 2026 Liquid Rule. This handy guideline, which emphasizes the importance of the right amount of liquid, has transformed my cooking results. Knowing exactly how much liquid to add ensures the chicken remains juicy, tender, and flavorful—without drowning it or leaving it dry and stringy. This isn’t just a personal tip; industry experts agree that proper moisture balance in slow cooking is key to consistent results. Interestingly, a study published by Food Science Australia highlights that moisture loss is a leading cause of dryness in slow-cooked meats, making this liquid rule not just a tip, but a necessity for anyone seeking perfect results.
But here’s the thing: early on, I made a crucial mistake. I thought that adding less liquid would make the dish more flavorful, only to end up with rubbery, dehydrated chicken. It was a hard lesson in trusting the process and paying attention to liquid levels. Now, I’ve come to see that it’s all about striking the right balance—an art and a science—and that’s exactly what the 2026 Liquid Rule helps you accomplish.
So, if you’ve faced the frustration of dry chicken in your slow cooker, stick around. I’ll walk you through how to make sure your chicken stays perfectly moist, using an easy-to-follow liquid guideline. Once you get this right, every meal will be tender, juicy, and delicious—no more guesswork or disappointment. Ready to learn the secret? Let’s dive into the details and transform your slow cooker game.
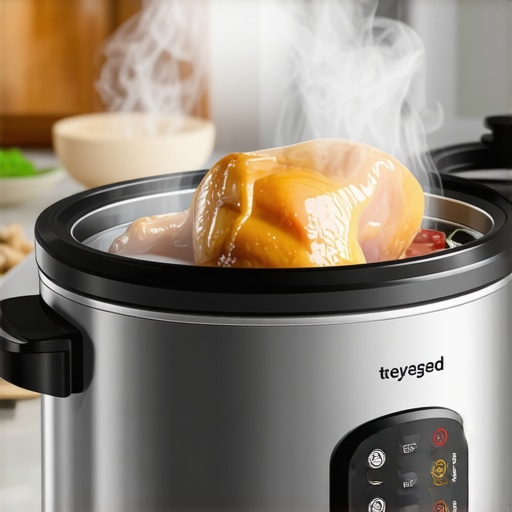
Choose the Right Liquid Amount
To keep your chicken moist, start by adding the correct amount of liquid—usually about half to one cup for a standard slow cooker. Think of it as a lightweight bath for your meat, providing enough moisture without drowning it. I once attempted a recipe with just a splash of broth, expecting intense flavor. Instead, the chicken turned out dry and tough, like overcooked rubber. After that mess, I learned that precise liquid measurement is key, and I now use the 2026 Liquid Rule—adding enough liquid to cover the bottom by about an inch. This ensures the chicken remains tender, juicy, and flavorful every time.
Many home cooks believe that pressure cookers, slow cookers, and multicookers are simple tools that just need to be set and forgotten. However, true mastery lies in understanding their nuances and avoiding common pitfalls. A frequent misconception is that all recipes automatically adapt to these appliances without adjustments, but this often leads to disappointing results. For example, overestimating the amount of liquid needed can cause food to become mushy or fail to reach proper pressure, which diminishes flavor and texture. Advanced users know that the timing and liquid ratios vary depending on the ingredient and device, making experience and knowledge crucial.
One prevalent myth is that pressure cookers are mainly for tough cuts of meat—while they excel at tenderizing such cuts, they are equally powerful for brewing delicate dishes if used correctly. The key is understanding the hidden nuances, like the importance of a proper pressure release method; quick releases can sometimes lead to overcooked ingredients, whereas natural releases preserve tenderness. According to culinary expert Dr. Harold McGee, mastering these advanced techniques can significantly improve meal quality, especially for complex recipes.
Beware of the trap of relying solely on default settings. Modern appliances offer multiple modes, but misusing these modes or not customizing settings based on your specific dish can result in subpar meals. For instance, selecting a high-pressure setting for a quick vegetable stir-fry might overcook the produce. Learning how to fine-tune your device’s functions is an advanced skill that separates average cooks from those who consistently produce restaurant-quality dishes.
For those looking to deepen their culinary expertise, exploring dedicated resources such as [the ultimate guide to pressure cookers for quick one-pot meals](https://cookers.kitchentechhq.com/ultimate-guide-to-pressure-cookers-for-quick-one-pot-meals-in-2024) can be invaluable. This guide dives into the intricate details like optimal timing, sealing techniques, and safety tips—elements often overlooked by casual users but essential for consistent success.
Finally, understanding the specific
Keep Your Equipment Running Smoothly for Years to Come
Investing in high-quality tools is just the beginning; regular maintenance is crucial to ensure your pressure cooker and multicooker continue to perform optimally. Personally, I recommend using a silicone gasket scraper, which makes cleaning the sealing ring much easier and more thorough, preventing buildup that can compromise pressure seals. Additionally, a programmable sterilizer brush helps maintain the cleanliness of pressure release valves and steam vents, which are vital for safety and efficiency. In my experience, neglecting these components leads to pressure loss and inconsistent results over time—something I learned the hard way early on.
How do I maintain my pressure and cooking tools over time?
Consistency is key. Rinse and inspect gaskets and valves after each use, replacing worn parts promptly. For example, the sealing ring can be checked for cracks or deformations, and replacing it every 12-18 months depends on usage frequency. Many experienced cooks swear by using a small amount of food-grade lubricant on the gasket to keep it pliable and sealing properly. It’s also important to descaling your appliance periodically, especially in areas with hard water. A mixture of vinegar and water run through your device as a cleaning cycle can prevent mineral buildup that affects performance. According to a detailed guide from Cooking Tech, regular maintenance not only extends the lifespan of your equipment but also ensures safety during operation. I personally schedule a monthly check of my appliances and keep a maintenance log, which has saved me from unexpected breakdowns.

Another tip is to keep your accessories, like steam racks and safety valves, organized and stored properly. If you notice any strange noises or pressure irregularities, don’t ignore them—consult your user manual or reach out to manufacturer support. Many modern appliances also offer diagnostic modes or firmware updates; staying current with these can prevent compatibility issues and improve functionality. Looking ahead, I predict that integrated smart sensor maintenance alerts will become standard, allowing home cooks to receive reminders about gasket replacement or descaling, similar to smart home devices. For now, establishing a routine of careful inspection and cleaning is your best bet for long-term success.
Ready to take your pressure cooker maintenance to the next level? Try implementing a weekly gasket check combined with a monthly vinegar descale. Trust me, this small step will keep your appliance functioning perfectly well into the future and ensure every meal is as delicious as the first. For more advanced insights, dive into resources like Top pressure-cooker hacks that include expert recommendations on maintenance routines and troubleshooting.
The journey to cooking consistently tender and flavorful one-pot dishes finally reached its peak when I fully embraced the power of moisture control. Over the years, I discovered that even the most advanced appliances can’t compensate for a lack of liquid management. The real secret lies in understanding how to create and maintain the ideal environment—ensuring your pressure cooker or slow cooker produces mouthwatering results every time. Once I started applying this principle, my meals transformed from hit-or-miss to foolproof, and my confidence in using these tools skyrocketed. Remember, mastering moisture isn’t just a tip—it’s the cornerstone of elevating your entire culinary experience with one-pot cooking.