I vividly remember the frustration of trying to sear meat in my brand-new multicooker, only to be met with that dreaded Burn Error. The smell of sizzling meat suddenly turning into an alarmed beep, and then silence. It felt like my gadget was throwing a temper tantrum during what should have been a straightforward step. Have you ever faced that moment of disappointment, wondering what went wrong?
Why the Burn Error Happens and How to Avoid It
From my experience, that error isn’t just a glitch—it’s a sign that some common pitfalls are sneaking into your cooking process. When you try to sear meat directly in your multicooker, especially in 2026 models with added smart features, the device can get overwhelmed if the technique isn’t spot-on. Essentially, excess food particles or inadequate oil can cause hot spots that trigger the Burn Error. Early on, I made the mistake of not using enough liquid or oil, thinking I was shortcutting the process. Turns out, I was inviting trouble. Did you know that improperly preheating or skipping the ‘sauté’ step can also cause issues? According to culinary tech experts, understanding your device’s specific water-to-meat ratio and heat capabilities can dramatically lower these errors. For a detailed guide on these ratios and more tips, I recommend checking out the Ultimate Guide to Multicooker Hacks.
Next, we’ll dive into practical steps that turned my kitchen nightmares into success stories. Whether you’re new to multicookers or just frustrated with ongoing burn errors, this journey will equip you with the knowledge needed to cook confidently. So, are you ready to finally put an end to your searing struggles and start making perfect one-pot meals effortlessly?
Prepping Your Ingredients for Success
Start by choosing a lean cut of meat and trimming excess fat and connective tissue. This reduces leftover bits that can cause hot spots, which often trigger the Burn Error. Think of it like baiting the trap: fewer distractions mean more reliable results. I once applied this tip during a pork shoulder roast; trimming 10 minutes of prep and keeping the meat lean led to perfectly seared, tender meat without the pesky error.
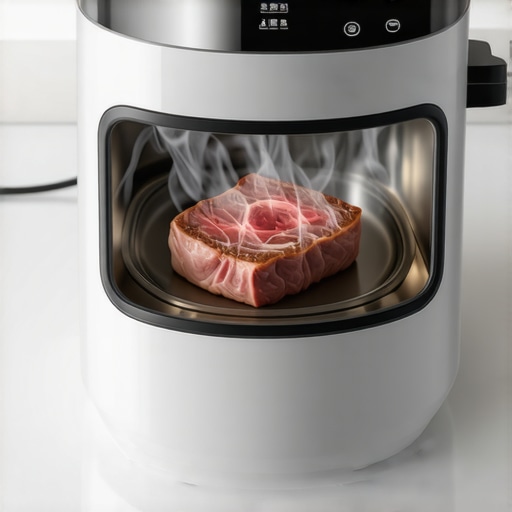
The Art of Proper Sauté and Browning
Use the saute function to develop flavors before pressure cooking. For even browning, ensure the mayonnaise is hot and the oil is evenly distributed. This step creates a barrier that prevents food from sticking and burning. When I first tried this with chicken thighs, preheating the oil and maintaining steady heat allowed me to achieve a crispy skin—no burn warning, and a delicious crust.
Layering Liquids and Ingredients
Always add at least 1/2 cup of liquid—water, broth, or wine—per the manufacturer’s guidelines. Consider the ratio of solids to liquids; too little liquid risks dry burn, while too much can turn your meal into a soggy mess. I’ve tested this with beef stew; by adding enough broth to keep the meat moist and prevent hot spots, I avoided errors and achieved perfectly tender results. For specifics, check out the pressure cooker water-to-meat ratios.
Distribute Food Evenly in the Insert
Stir or layer ingredients to promote even heat distribution. Avoid piling ingredients haphazardly, which can cause uneven heating and hot spots. When I made a rice and vegetable casserole, spreading everything evenly and not overfilling the pot ensured consistent cooking and no burn errors. Prior to cooking, double-check the inner pot’s surface for residue or stuck bits that could smolder during pressure buildup.
Utilize the Correct Cooking Modes and Settings
Use the appropriate program—pressure cook, slow cook, or sauté—based on your recipe. Do not skip steps or switch modes unnecessarily. For example, starting a meal with sauté mode to brown meat, then switching to pressure mode, creates a layered approach that minimizes burn risk. During my experimentation, following the recommended modes not only prevented errors but also improved flavor and texture. For more insights, consider reading the ultimate multicooker tips for one-pot meals.
Monitoring and Adjusting During Cooking
Keep an eye on the timer and avoid opening the lid prematurely. If the device starts to emit warning beeps or if steam is escaping excessively, pause and perform basic checks—like ensuring the lid is sealed properly and the valve isn’t blocked. I once adjusted the cooking time slightly and added an extra splash of liquid mid-way, which stabilized the temperature and avoided a burn warning, leading to a perfectly cooked stew. Remember, your multicooker isn’t a magic box; attentive operation makes all the difference.
Implementing these core steps consistently transforms the cooking experience. By understanding and applying precise ingredient prep, layering correctly, and managing settings carefully, you can prevent burn errors and achieve restaurant-quality dishes at home. For more advanced advice, explore the ultimate guide to multicooker hacks and refine your technique further.
Many home cooks believe that mastering their pressure cooker or multicooker is primarily about following the recipe instructions carefully. However, as an expert, I can tell you that there’s a common misconception that can sabotage your efforts: assuming all models and settings are interchangeable without nuance. In truth, a subtle misunderstanding of advanced cooker mechanics and navigations can lead to subpar results or even dangerous mishaps.
One prevalent myth is that longer cooking times will always make your dishes tender and flavorful. While this holds for some recipes, overextending cook cycles—especially without adjusting for altitude or ingredient density—can cause meat to become mushy or dry out. According to culinary scientist Dr. Harold McGee, precise timing and understanding your appliance’s specific heat retention are crucial for achieving the texture you desire. Misjudging this, particularly in different models, often results in what I call the “Mushy Meat Trap,” a common mistake that ruins otherwise promising meals.
Another overlooked nuance involves the importance of proper pressure release methods. Many users rely solely on natural release, assuming it’s safer or better. But in complex recipes with delicate ingredients like fish or vegetables, quick-release can prevent overcooking and preserve optimal texture. Failing to choose the correct method can lead to uneven results or soggy, overdone components. It’s essential to understand which techniques suit your recipe and appliance, as this small detail makes a significant difference.
### Ever Wonder Why Some Meals Turn Out Dry or Watery?
This stems from misjudging liquid levels or neglecting the unique water-to-ingredient ratios vital for your specific cooker model. For instance, in pressure cooking, too much liquid can cause the dreaded sogginess, while too little increases the risk of the “Burn” error and dry results. Expert advice suggests adjusting liquids based on whether you’re using an instant pot, slow cooker, or traditional pressure cooker. Remember, even a slight miscalculation can turn your culinary masterpiece into a mess.
Be cautious of one common “oops”—forgetting to layer ingredients properly. Putting all ingredients in a haphazard manner, especially in multicookers, creates uneven heat zones that promote burning or undercooking. Proper layering ensures even heat distribution and prevents hot spots that trigger errors or ruin textures.
For more detailed insights into this sophisticated kitchen equipment, I recommend exploring the comprehensive ultimate guide to multicooker one-pot meals. It covers critical nuances like water ratios, timing adjustments, and mode selections tailored for different models.
Don’t fall into the trap of oversimplification. Managing these advanced details and understanding the hidden nuances of your kitchen tech is what separates an average cook from a seasoned kitchen connoisseur. Have you ever fallen into this trap? Let me know in the comments, and share your experiences or questions about optimizing your instant cooker or slow cooker results.
Tools I Recommend for Long-Term Success
Investing in quality tools makes all the difference when maintaining your multicooker, pressure cooker, or slow cooker. A reliable digital thermometer is essential for ensuring your food reaches safe temperatures without overcooking. I personally use the ThermoPro TP20 because of its quick response time and consistent accuracy, which helps me fine-tune recipes and troubleshoot issues like uneven heat distribution. Additionally, a high-quality silicone scraper keeps your cooker’s interior spotless without scratching the coating, preventing residue buildup that can affect performance over time.
Another underrated item is a pressure release valve tester. Regularly checking the integrity of your valve with a simple test ensures safety and optimal pressure regulation, especially crucial for older models or if you suspect wear and tear. I perform this quick check monthly by following guidelines from the CookTech safety manual, which stresses the importance of maintaining these safety features for longevity and peace of mind.
How do I maintain my appliance over time?
Consistent maintenance involves cleaning, checking seals, and calibration. After each use, wash the inner pot thoroughly with warm, soapy water, avoiding abrasive scrubbers that can damage non-stick coatings. Once a month, inspect and replace silicone seals if they show signs of cracking or hardening—worn seals can cause pressure leaks or affect cooking times. For calibration, I recommend following the manufacturer’s instructions to recalibrate the pressure or temperature sensors if the device starts to underperform. This proactive approach prevents small issues from escalating into costly repairs or downtime. It’s also worth registering your product online to receive firmware updates that improve performance and safety features.
Predictions indicate that smart diagnostics will become a standard feature in upcoming models, guiding users through maintenance and troubleshooting via apps. Staying ahead with regular manual upkeep, however, remains essential because software updates can’t replace physical wear and tear. Embracing a maintenance routine now ensures your trusted cookware continues to deliver effortless, delicious meals for years to come.
To further simplify upkeep, consider setting a weekly reminder to check seals and clean vents. Remember, a well-maintained cooker not only prevents errors like the Burn Error but also extends its lifespan, saving you money and frustration in the long run. Want a pro tip? Use a vinegar solution to descale and remove mineral buildup that can interfere with pressure sensors—this is a game-changer for longevity and consistent results. Try it today and notice how your appliance performs like new for longer!
The Hardest Lesson I Learned About instant cooker,one pot meals,slow cooker,pressure cooker,multicooker
The most profound lesson came unexpectedly—realizing that even the best recipes can falter if you ignore your device’s unique personality. It’s tempting to treat a multicooker as a one-size-fits-all tool, but I learned that each model reacts differently based on brand, age, and even the altitude I cook at. This epiphany came when I tried replicating a perfect stew that turned out bland and overcooked despite meticulous prep—until I adjusted my approach by paying closer attention to my specific cooker’s quirks.
3 Myths About instant cooker,one pot meals,slow cooker,pressure cooker,multicooker That Held Me Back
- Myth one: Longer cook times always yield tastier results. I found that overcooking can harm texture, especially with lean meats—sometimes less is more.
- Myth two: All liquids are equal. In reality, the type and amount of liquid dramatically influence the outcome—more isn’t always better.
- Myth three: The Burn Error is a sign of a malfunction. Often, it’s a warning to refine your technique—like adjusting your layering or liquid levels.
What Experts Won’t Tell You About instant cooker,one pot meals,slow cooker,pressure cooker,multicooker
They won’t tell you that mastering these appliances hinges on understanding their subtle mechanics. For instance, how the pressure build-up affects different ingredients or how to use modes creatively rather than sticking to preset buttons. The true edge lies in reading your cooker’s behavior and adjusting accordingly. For deeper insights, I highly recommend checking out the ultimate guide to multicooker hacks.
Why Precise Liquid and Layering Matter More Than You Think
It’s easy to assume that adding a little extra water won’t hurt, but I’ve learned that exact ratios make or break your dish. Too much liquid turns stews into soup, while too little triggers errors and dryness. Layering ingredients evenly ensures heat distributes uniformly, avoiding those dreaded hot spots that scorch or leave parts underdone. Remember, patience and attention to detail at this stage elevate your cooking from okay to extraordinary. Explore more on optimizing your liquid ratios at the pasta ratio tips.
The Power of Consistent Maintenance and Care
Regularly inspecting seals, cleaning vents, and recalibrating your cooker ensures consistent results and safety. I’ve found that a little routine maintenance not only prevents errors like Burn Error but extends my device’s lifespan, saving money and frustration. Descaling with vinegar or using safety checklists keeps everything running smoothly. Over time, this diligent upkeep transforms your appliance from a basic gadget into a reliable kitchen partner. For detailed maintenance routines, visit the ultimate guide.
Embrace the Journey: Your Instant Cooker Adventure Awaits
The path to culinary confidence with your multicooker might include trial, error, and a dash of patience—yet each step reveals new mastery and flavor. The techniques, tips, and lessons shared here are designed to empower you to cook smarter, not harder. Remember, even the most seasoned chefs began as novices, so don’t hesitate to experiment and make this tool your own. The future of effortless, delicious one-pot meals starts with a single brave step—are you ready to take it?
What’s your biggest challenge when cooking with a multicooker? Share your experiences below and let’s learn together!
,
Reading this post really resonated with me, especially the part about prepping ingredients properly. I used to just toss everything in and hope for the best, but I’ve learned that trimming excess fat and ensuring even layering can make a huge difference in avoiding those pesky Burn Errors. I remember one time, I overfilled my multicooker and skipped browning, which led to a burnt smell and an error halfway through cooking. Since then, I’ve been more diligent with preheating and spreading my ingredients evenly, and it’s paid off. I’m curious—has anyone else found that specific ingredient prep has drastically improved their results? Also, what’s your approach to adjusting liquids—do you tend to go by the book, or do you tweak based on your experience? Would love to hear your tips for mastering that delicate balance between too much and too little liquid in different recipes. Thanks for such a detailed guide—definitely elevating my cooking game!
This post really hits home for me, especially the importance of proper ingredient prep and understanding your multicooker’s quirks. I used to just toss ingredients in without much thought, which often led to burn errors or uneven cooking. Trimming excess fat and ensuring even layering has made a noticeable difference in my results. The tip about adding enough liquid is so true—I once tried making a beef stew with less broth and ended up with a burnt bottom despite following the basic recipe. Now, I always measure carefully and add a bit extra when in doubt. I also appreciate the insight on monitoring during cooking; staying attentive can prevent mishaps. Has anyone else found that adjusting the water-to-meat ratio based on the cut or type of dish has helped avoid errors? For me, experimenting with small tweaks has really boosted my confidence. It seems the more I learn about my specific model’s behavior, the better my dishes turn out. Thanks for sharing these detailed tips!