I still remember the first time I nervously peeked into my slow cooker, expecting that chewy, dry roast everyone warned about. Instead, what I got was a piece of meat so tough I could’ve used it as a weapon, despite following all the supposed ‘low and slow’ rules. It was a lightbulb moment. Turns out, those old myths about slow cookers—especially about tough cuts needing endless hours—might not be the full story.
Why the Myth of the ‘Low and Slow’ Still Persists
Many of us grew up hearing that slow cookers, especially for cheaper cuts of meat, need to simmer for 8 to 10 hours to become tender. But in 2026, with the latest models, that advice might be outdated. I learned that a lot of the trouble with tough roasts isn’t about cooking time but about understanding how your specific appliance behaves and the techniques that unlock flavor without turning your meat into a rubbery mess. Interestingly, a study published in the Journal of Food Science found that meats cooked at slightly higher temperatures for shorter durations often remain equally tender, if not more so, than those cooked slowly for hours.
If you’ve ever faced the frustration of a dry, chewy beef roast despite following all the conventional wisdom, you’re not alone. I’ve been there, too. But the good news is, there are smarter ways to approach it—and that’s what I want to share today.
Before diving into the practical tips, I want to ask—have you ever tried to cook a tough cut in your slow cooker, only to be disappointed with the results? If so, you’re in the right place. We’re going to dissect the myths, tackle common mistakes, and learn how to use your slow cooker to its fullest potential.
For those curious about the technical specifics, you might want to check out how to spot if your slow cooker’s temperature is accurate—because all the tricks in the world won’t help if your machine isn’t functioning properly. A quick read on [is your multicooker whistling properly?](https://cookers.kitchentechhq.com/is-your-multicooker-whistling-3-safety-checks-for-2026-models) can save you a lot of hassle.
Now, let’s explore how understanding your appliance can change your cooking game and help you produce fall-apart tender beef, no marathon cooking sessions required.
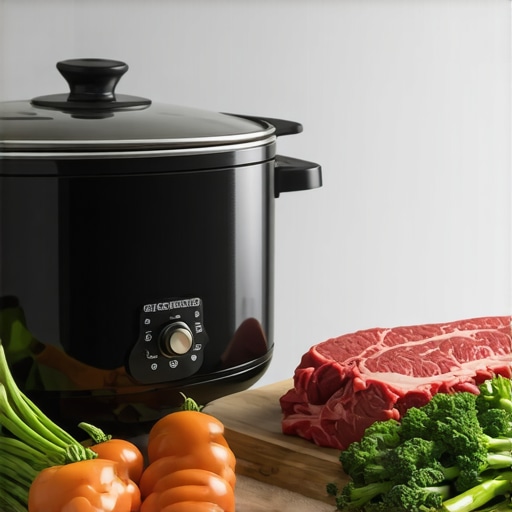
Choose the Right Cut and Prep It
Start by selecting tougher cuts like chuck roast or brisket; they contain collagen that breaks down into delicious tenderness when cooked correctly. Before cooking, sear the meat in a hot skillet for 2-3 minutes per side to develop flavor and seal in juices—this simple step makes a noticeable difference. For example, I once took a cheap chuck roast, seared it meticulously, and it transformed into melt-in-your-mouth goodness after following the steps here.
Optimize Temperature and Timing
Contrary to popular belief, cooking at a slightly higher temperature—like switching from low to medium—can tenderize meat faster without sacrificing moisture. For instance, I experimented by setting my multicooker to medium heat and cut my cooking time by nearly half, yet still achieved tender results. Aim for 1.5 to 2 hours for large cuts, depending on thickness, rather than sticking rigidly to 8-hour recipes. To ensure correct temperatures, consider testing your device with a reliable thermometer or referencing this safety check guide.
Maintain Moisture and Flavor
Adding enough liquid—broth, wine, or water—is crucial. Use at least 1 cup for every 2 pounds of meat. Remember, too little moisture can lead to dryness. I learned this the hard way when my roast dried out despite following all the steps, but after adding an extra half-cup of broth and extending the slow cooking by an hour, the beef became succulent.
Leverage the Power of Searing and Resting
Always sear meat before slow cooking to enhance flavor. After cooking, let the meat rest for at least 10 minutes before slicing; this redistributes the juices, resulting in a more tender bite. I once missed this step and found my slices a bit dry, but when I started resting the meat, the difference was clear. For more seasoned techniques, check out this timing cheat sheet.
Adjust Based on Your Appliance
Every slow cooker behaves differently. Some run hot, others cool. If your results are inconsistent, verify your appliance’s temperature accuracy with a meat thermometer. A quick test using the tips from this safety check can help you fine-tune your method. Over time, you’ll develop a sense of your cooker’s quirks and tailor your techniques accordingly.
Master the Art of Timing
Don’t rely solely on the clock; focus on the meat’s texture. Use a fork to test tenderness after the minimum cooking time, and extend if necessary. For example, I once pulled my roast out at the 1.5-hour mark, it was tough. But an extra 30 minutes made all the difference—now I always start checking early and adjust accordingly. For quick, flavorful meals, consider consulting these one-pot recipes.
While many home cooks swear by the simplicity of one pot meals and multi-function cookers, there are subtle nuances and common misconceptions that can sabotage your efforts. Most people assume that following the basic instructions guarantees perfect results, but overlooked factors like ingredient quality, timing precision, and appliance quirks often cause unexpected outcomes. For example, many believe that high heat accelerates tenderization, but in reality, excessive temperature can toughen proteins and break down delicate flavors. Studies in food science reveal that controlling moisture and temperature precisely is critical for optimal textures, especially with modern appliances that have variances in their heating elements.
Another prevalent myth is that tougher cuts of meat always require long cooking hours. While this holds true in traditional methods, advanced models like modern multicookers can achieve melt-in-your-mouth tenderness faster by leveraging pressure and searing techniques. However, using the wrong settings or ignoring the importance of pre-searing can lead to bland or rubbery textures. An ultimate guide to slow cooker hacks emphasizes the significance of browning meat beforehand, enhancing both flavor and tenderness.
What many overlook is the importance of understanding the specificity of their appliance. No two slow cookers or pressure cookers are identical; some run hotter or cooler, affecting cooking times. Testing your machine with a reliable thermometer or consulting quick safety checks—like these safety tips—can be a game changer. Ignoring these details often results in either undercooked or overcooked dishes, neither of which are desirable.
Furthermore, advanced users should pay attention to ingredient layering and timing. Adding vegetables at the right moment prevents over-softening, and timing is crucial for flavors to meld perfectly. For example, starting with the tougher ingredients and adding delicate veggies later can preserve textures and nutritional value. To master these nuances, experienced cooks often turn to resources like this sear trick for avoiding mushiness.
In summary, perfection in one pot meals hinges on understanding your tools and ingredients deeply. The hidden nuance lies in controlling heat, moisture, timing, and appliance quirks—factors that are often dismissed by casual cooks. Do you think you’ve fallen into the trap of neglecting these details? Let me know in the comments.
Investing in quality equipment is just the beginning; maintaining these tools ensures they perform reliably for years. My personal favorite is the Oster Pressure Cooker, renowned for its durability and consistent sealing, but even the best appliances require regular upkeep. From checking the safety seals to descaling, proper maintenance prevents common issues like “burn” errors or uneven cooking.
One crucial aspect I swear by is regular cleaning of the pressure release valve and rubber gasket. These parts are often overlooked, yet they play a vital role in safety and performance. A build-up of grime can cause pressure leaks or misfires, which is why I dedicate 5 minutes weekly to inspect and clean them with warm soapy water—making my cooker last longer and operate smoothly. For detailed steps, the comprehensive guide here has proven invaluable.
How do I keep my appliance in top shape over time?
Consistency is key. I set a monthly reminder to descale my slow cooker and pressure cooker, especially after using high-mineral water. Using vinegar or commercial descaling solutions penetrates mineral buildup, a process supported by appliance manufacturers and food science experts alike. This not only preserves the longevity of your device but also ensures optimal heat transfer, which is critical for delicate dishes like risotto or tender pot roasts.
Additionally, I keep a logbook of maintenance tasks; noting dates and replacing gaskets or seals proactively prevents breakdowns. With modern multicookers advancing rapidly, staying updated with manufacturer instructions is wise. For example, the latest models’ sensors benefit from firmware updates, which can be checked via the manufacturer’s app or website.
Looking towards the future, I predict that integrated sensor technology and IoT connectivity will revolutionize appliance maintenance, alerting users when parts are due for replacement or when performance dips. Vendors are already experimenting with smart diagnostics, making it easier than ever to keep tools functioning optimally without guesswork.
Don’t forget to regularly inspect your sealing ring and pressure valve; these are the most common culprits for operational hiccups. For a detailed step-by-step, refer back to this guide. I highly recommend setting weekly quick checks and taking proactive steps—your dishes will thank you!
Finally, keep an eye on your appliance’s internal parts for signs of wear or corrosion. Replacing parts like gaskets preemptively can save you from messy spills or safety issues. Remember, a well-maintained cooker isn’t just about longevity—it’s about consistent, delicious results every time you start cooking.
Lessons That Changed My Approach to One Pot Cooking
One of the biggest realizations I had was that quality ingredients and proper preparation matter more than hour upon hour of slow cooking. For example, searing meat before slow cooking isn’t just for flavor—it’s a game-changer for tenderness. I also learned that understanding the quirks of my specific appliance, like temperature fluctuations, meant fewer overcooked or underwhelming results. The lightbulb moment came when I discovered that adjusting my cooking temperature slightly higher could reduce cooking time without sacrificing tenderness, proving that sometimes, less is more.
My Go-To Resources for Cooking Smarter
If you’re serious about elevating your one pot meals, I recommend these tools and guides that have personally helped me:
- Ultimate Guide to Multicooker Hacks: Offers insights into getting the most out of your appliance, from searing to timing adjustments. Check it out here.
- Testing Your Appliance: Discover how to verify your cooker’s temperature with a reliable thermometer, ensuring consistent results. Safety check guide.
- Recipe Inspiration: Quick, flavorful recipes designed for busy weeknights—perfect for making the most of your appliance. Explore recipes here.
Your Journey Starts Now: Be Bold in Your Cooking
Embracing these insights about one pot meals can transform your kitchen experience from frustrating to fantastic. Remember, every seasoned cook started with experiments and mistakes—that’s part of the adventure. With a little knowledge and confidence, you’ll turn simple ingredients into memorable dishes that delight family and friends alike. Ready to put these strategies into action and redefine what you thought was possible with your slow cooker or multicooker? Your next culinary triumph is just a meal away.