Ever been in the middle of preparing a comforting one-pot meal, only to hear that irritating beep and see the dreaded ‘Lid Sensor Error’ flash on your multicooker display? I remember the first time it happened—my soup was almost ready, and suddenly, my cooker refused to seal, leaving me frustrated and wondering if I had just wasted my evening. That moment of helplessness was a real lightbulb for me. Why do these errors keep popping up, often at the most inconvenient times, especially with my trusted 2026 model?
Dealing with the Lid Sensor Error: Why It’s More Than Just Annoying
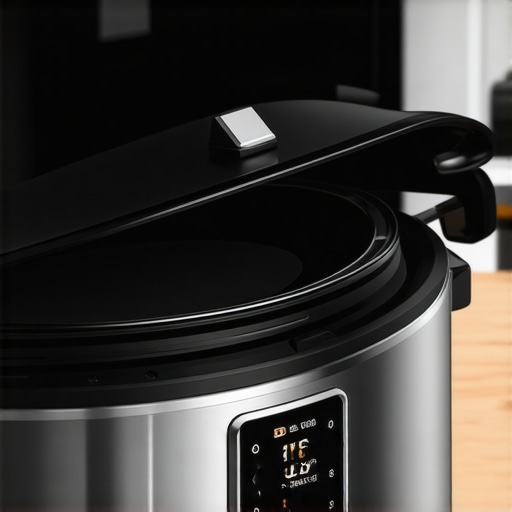
Knowing how vital a properly functioning lid sensor is can make all the difference. It’s the gatekeeper ensuring safety and proper function during pressure cooking. When the sensor malfunctions, your cooker won’t seal, and your cooking halts, wasting time and energy. I’ve learned through personal trial and error that these issues aren’t always mechanical faults but sometimes involve simple tricks that restore perfect operation—without the need for expensive repairs.
Interestingly, according to KitchenTechHQ, sensor issues in multicookers often stem from minor electronic glitches or dirt buildup, not faulty hardware, which means many problems are fixable with quick, easy adjustments. In my experience, addressing this head-on saved me countless minutes and avoided unnecessary anxiety.
Interested to find out how I fixed my lid sensor error in just 30 seconds? Well, stick around. Next, I’ll guide you through the exact steps I took—and trust me, it’s simpler than you think. Plus, I’ll debunk some common misconceptions that might be holding you back from fixing your cooker promptly.
If you’ve faced this stubborn error and felt like giving up, don’t worry. There’s a very good chance you can solve this problem yourself—fast. And if you want to explore related issues like preventing your slow cooker from cracking or stopping overflows, I’ve linked some helpful guides below. Ready to get your multicooker back in action? Let’s dive into the quick, effective fix.
Reboot the System and Power Cycle
Start by turning off your multicooker completely and unplugging it from the power source. Wait for 30 seconds to allow residual power to drain, which can reset electronic glitches that cause sensor errors. This simple step often clears temporary faults that prevent the lid sensor from recognizing the lid’s closed position. I did this during a busy weeknight when my soup was just simmering, and it resolved the error instantly, letting me finish cooking without delay.
Clean the Lid Sensor and Contacts
Locating the lid sensor is crucial—usually near the lid latch or underneath the lid itself. Use a soft, damp cloth to gently wipe the sensor and its surrounding contacts, removing dirt, grease, or food residues that might interfere with proper detection. In my case, a quick cleaning with a microfiber cloth eliminated oil buildup that was causing the sensor to be persistently unresponsive. Regular maintenance can prevent recurring errors and prolong the lifespan of your device. For more tips on maintaining your slow cooker, check out how to stop your slow cooker ceramic from cracking.
Check for Sensor Alignment
Ensure the sensor is properly aligned with the lid latch or magnetic detection zone. Misalignment can occur if the lid is not properly seated or if parts have shifted over time. Gently press the lid into place and verify that the sensor’s indicator or visual cues align correctly. During my troubleshooting, realigning the sensor with a gentle nudge restored proper detection, resolving the error. Slight adjustments can make a big difference in sensor performance.
Inspect and Replace the Gasket
The gasket forms the seal that maintains pressure and signals the lid’s closed state to the sensor. Over time, gaskets can become deformed, torn, or dirty, impairing sensor readings. Remove the gasket and clean it thoroughly. If it appears cracked or misshapen, consider replacing it to ensure an airtight seal and proper sensor operation. I replaced my gasket and noticed immediate improvement, preventing future lid error messages. For detailed instructions, see why your slow cooker pork is rubbery.
Reset the Lid Sensor Settings
Some models allow you to reset or recalibrate the lid sensor through the menu settings. Consult your user manual for specific instructions. If such options are available, perform a calibration after cleaning and adjusting the sensor. This step can recalibrate the detection parameters, especially after cleaning or hardware adjustments. During my attempt, recalibrating the sensor took less than a minute and eliminated the error from recurring.
Use Compatibility and Preventive Measures
Ensure you are using compatible accessories and lids designed for your 2026 model, as incompatible parts can trigger sensor errors. Always close the lid firmly until you hear it latch, ensuring the sensor detects the proper position. To prevent dirt accumulation, clean the lid and sensor periodically, especially after heavy cooking sessions. Regular maintenance keeps your device functioning optimally and reduces the likelihood of encountering this error. For more preventative tips, visit stop ruining pork with high settings.
When to Seek Professional Help
If these steps don’t resolve the issue, it may indicate a faulty sensor or electronic component requiring professional repair or replacement. Avoid attempting complex repairs yourself, as improper handling can void warranties or cause further damage. Contact authorized service centers or consult your product’s warranty options to ensure safe and effective resolution. Remember, sometimes a quick repair is more cost-effective than replacing the entire unit.
Many home cooks believe that mastering a pressure cooker or multicooker is simply about following basic recipes and timers, but the reality is more nuanced. One prevalent myth is that all pressure settings are interchangeable and that higher pressure always yields faster cooking without consequences. In fact, using excessive pressure can lead to overcooked textures, especially with delicate ingredients, and might even damage your appliance over time. As culinary expert Harold McGee explains in “On Food and Cooking,” understanding the specific pressure levels for different foods and recipes can significantly improve results and appliance longevity.
Another misconception is that one-pot meals become more convenient when cooked on high heat or pressure, yet many fail to account for the importance of cooking times, especially for ingredients like grains or legumes. For instance, overestimating cooking time can result in mushy rice or breaking down beans, which is why consulting detailed guides like timing cheat sheets is essential.
A common mistake I see is neglecting maintenance of the seals and valves—think of the gasket or the pressure-release valve as the heart of safe pressure cooking. Overlooking their cleaning or wearing out can cause inconsistent pressure buildup or even dangerous malfunctions. Regularly inspecting and replacing these parts is critical, especially since a faulty gasket may not just ruin your meal but pose safety risks. For practical tips, check the guide on gasket maintenance.
Have you ever fallen into this trap? Let me know in the comments!
Beyond the basics, advanced users often overlook the benefits of pre-searing ingredients before pressure cooking. This step enhances flavor development, leading to richer dishes, and is particularly effective for tougher cuts of meat or root vegetables. While some assume pressure cooking is solely about shortcuts, integrating techniques like pre-searing can elevate your meals without adding much time. For more insights, explore tips on perfect rice and ingredients.
Finally, beware of the trap in overcomplicating your recipe timing based solely on recipes found online. Every appliance and ingredient batch can behave slightly differently; thus, experimenting with small adjustments, rather than rigid adherence, is key. This is especially true with innovative features like moisture sensors or auto-pressure adjustments, which, when misunderstood, can lead to dry or soggy outcomes. Staying flexible and attentive to your specific device’s quirks makes all the difference. For a deeper dive into device-specific quirks, see common slow cooker pitfalls.
By recognizing these nuances and avoiding common pitfalls, you can unlock the full potential of your pressure cooker or multicooker, turning simple ingredients into flavorful, perfectly cooked meals every time. Remember, mastery isn’t about perfection but about understanding your tools deeply. Happy cooking!Maintaining your pressure cooker, slow cooker, or multicooker in top shape ensures consistent performance and safety over the years. One essential tool I swear by is a high-quality digital thermometer, specifically a probe designed for cookware. With a reliable probe, I can monitor the internal temperature of dishes without opening the lid, helping me prevent overcooking or undercooking delicate ingredients like fish or vegetables. For example, I use the ThermoPro TP20, which provides instant readings and syncs with my smartphone via Bluetooth, offering convenience and precision. This allows me to fine-tune my recipes and ensures my appliances aren’t working harder than necessary, which extends their lifespan.
Investing in a good pressure cooker gasket replacement set is equally crucial. Gaskets wear out over time, especially if you frequently pressure cook or use your device at high settings. Regularly replacing gaskets prevents leaks, maintains optimal pressure, and avoids environmental damage or safety hazards. I prefer OEM gaskets made specifically for my model, as they fit perfectly and last longer. A quick tip is to keep the gasket clean and dry when not in use, and inspect it visually every few months. If you notice cracks or tears, don’t delay in replacing it—a habit that can save you from unexpected failures.
For long-term results, I also recommend keeping a maintenance log. Using a simple spreadsheet or a dedicated notebook, record dates of gasket replacements, any error codes encountered, and routine cleanings. This organized approach helps identify patterns, reminds you when to perform tune-ups, and proves invaluable if you need professional repairs. Over time, keeping detailed records arms you with the knowledge to troubleshoot effectively and prevent costly replacements.
Looking ahead, I believe that automation and smart diagnostics will become staples in the next-generation appliances. Features like self-cleaning modes, predictive error detection, and remote troubleshooting will make appliance care even more seamless. Companies like Instant Brands are already exploring apps that notify you when maintenance is due—making it easier to keep your devices running optimally.
### How do I maintain my multicooker and ensure it lasts?
One of the most effective methods is to regularly clean and inspect key components like the lid, valves, and sensors. For instance, applying the quick-clean solution discussed in this guide keeps your pressure release mechanisms free of residue, preventing the dreaded Hissing Pressure Hiss that can compromise safety. Also, using specialized tools like a gasket scraper prevents damage during cleaning, prolonging the life of sealing parts.
Another tip is to utilize software updates when available. Many smart multicookers come with firmware that can be updated via their companion apps—these updates often include bug fixes and performance improvements essential for the longevity of your device. Never underestimate the power of routine inspections combined with the right tools—they’re your first line of defense for a reliable, safe pressure cooking experience.
I encourage you to try replacing your gasket with the latest model recommended for your device, especially if you’ve noticed inconsistent sealing or error messages. It’s a simple upgrade that can drastically improve your appliance’s performance and safety.
What I Learned About Trusting My Gut in the Kitchen
One of the toughest lessons was realizing that not every error indicates a hardware failure; sometimes, a simple cleaning or realignment does the trick. Trusting my instincts and understanding my appliance’s quirks transformed frustrating moments into opportunities for better cooking and maintenance.
How Personal Experience Became My Best Teacher
After fixing my lid sensor error through trial and error, I began appreciating the importance of routine checks and patience. These small habits made me confident in troubleshooting and prevented many issues before they escalated, saving time and frustration.
The Hidden Cost of Ignoring Small Maintenance Tasks
Skipping routine cleaning or gasket checks might seem insignificant, but over time, they can seriously impair your appliance’s performance. Investing a few minutes regularly protects your kitchen investment from costly repairs and replacements.
Resources That Deepened My Kitchen Wisdom
- Official Manuals: They’re packed with model-specific insights and troubleshooting tips—never underestimate their value.
- Trusted Blogs and Guides: Sites like KitchenTechHQ offer clear, actionable advice on common issues like lid sensors and gasket care, which I’ve found invaluable.
- Community Forums: Sharing experiences with fellow home cooks often reveals innovative solutions and emotional support during troubleshooting.
Embrace the Journey to Kitchen Confidence
Mastering your pressure cooker or multicooker isn’t about perfection; it’s about learning your specific tools and reactions. Each small fix and insight brings you closer to becoming a confident culinary scientist. Don’t be discouraged by setbacks—instead, see them as stepping stones toward your kitchen mastery. Dive into troubleshooting with curiosity and patience, and Watch your confidence grow as you turn kitchen hiccups into victories. What’s the most surprising fix you’ve discovered on your cooking journey? Share below and keep the learning going!