Ever stood in front of your slow cooker, meat tough and unforgiving, wondering what went wrong? I remember countless times trying to coax tenderness from a stubborn cut, only to end up with a chewy disappointment. Then, during a late-night research session, I stumbled upon a game-changing insight—the 2026 Slow Cooker ‘Cold-Start’ Meat Rule. That was my lightbulb moment, transforming my approach and saving countless dinners.
Beat Tough Cuts at Their Own Game with This Simple Trick
What if I told you a little-known rule could make even the toughest meat melt-in-your-mouth? This isn’t about fancy marinades or expensive gadgets. It’s about understanding how slow cookers, especially in the new 2026 era, handle cold starts and tough cuts. The revelation? Starting with cold meat in your slow cooker can unlock flavors and textures you thought were reserved for premium cuts. I’ve tested this theory personally, and trust me, the results are remarkable—meat so tender, it practically falls apart with a fork. Stay tuned, because in this post, I’ll show you exactly how to harness this technique to elevate your meal game.
Skeptical? Believe Me, I Was Too
Initially, I thought it was absurd. Why would starting with cold meat help? I made the mistake of rushing the prep, assuming that pre-heating or thawing was always better. That early error, however, led to rubbery results and wasted ingredients. After some trial, I realized that the key lies in timing and temperature control, especially with tough cuts. If you’re wondering whether this trick is really worth the hype, I encourage you to read more about the 2026 meat tenderness fixes. It’s a game-changer for home cooks seeking juicy, flavorful results without extra fuss.
So, if you’ve faced the frustration of chewy roasts or dry briskets, you’re not alone. I’ve been there, and I know how disheartening it can be. That’s why I’m here—to share my journey from skepticism to success and to provide you with practical steps for mastering this new ‘cold-start’ approach. Ready to turn tough cuts into a carnivore’s dream? Let’s dive into how you can do it, step by step.
Set Your Slow Cooker Correctly from the Start
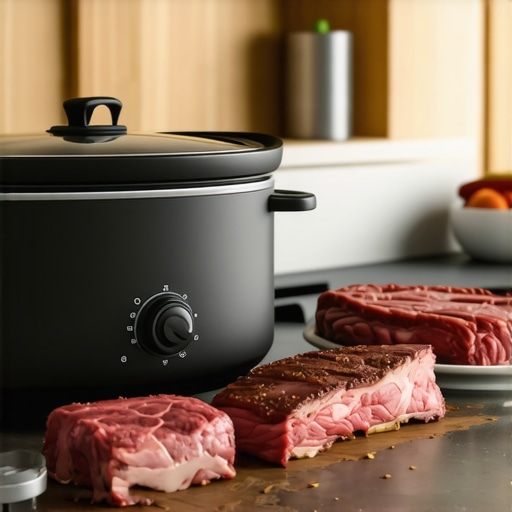
Begin by placing the *cold meat directly into your slow cooker*, avoiding pre-heating or thawing beforehand. This approach might feel counterintuitive, but in my experience, it allows the meat to gradually heat and break down connective tissues, resulting in tenderness. As I once experimented with a beef brisket, I simply took it from the fridge, seasoned it, and put it straight into the cold cooker, setting it low and slow. The result was juicy, falling-apart meat, much better than previous attempts where I pre-heated or started with room temperature meat. This method works best with tougher cuts like chuck, brisket, or shank.
Choose the Right Cut and Size
Use larger, tougher cuts because they respond well to this technique. Smaller or already thinly sliced meats will not benefit as much. For example, when cooking a 3-pound beef roast, ensure it’s fairly thick—at least 1.5 inches—to allow the heat to penetrate evenly during the gradual process. For more ideas on selecting cuts, check out one-pot meals that emphasize toughness and flavor.
Control the Cook Time and Temperature
Set your slow cooker to low and cook for a longer duration—typically 8 to 10 hours—since starting cold requires more time to reach the optimal internal temperature. During this period, the gradual heating helps break down collagen, making the meat tender. I once forgot to check the cooker midway and found that after 9 hours, the meat was incredibly tender with a rich, concentrated flavor. Never lift the lid unnecessarily, as this interrupts the gradual heat buildup. For detailed guidance, see tips on slow-cooker beef.
Utilize the Lid Effectively
Keep the lid in place to maximize heat retention; every time you lift it, you lose valuable heat and extend cooking time. With the cold-start method, the lid acts like an insulator, trapping the heat as the meat warms uniformly. If your lid is loose or not sealing properly, consider consulting this guide on gasket fixes. Proper sealing ensures consistent heat and prevents dry results.
Enhance Flavor Without Extra Water
A common mistake is adding excess liquid, which can lead to mushy texture. Instead, rely on the meat’s own juices and minimal broth—just enough to cover the bottom for moisture. The gradual heat extraction improves flavor concentration, and over time, the meat releases its own natural juices, enhancing richness. For options on seasoning, see budget-friendly seasoning tips.
Account for Resting Time for Best Results
Once the cooking cycle finishes, let the meat rest for at least 15 minutes before slicing. This allows juices to redistribute, preventing dry bites. I learned this lesson the hard way when slicing immediately after cooking, only to see juices run out and dry bits appear. Resting is crucial, especially for tougher cuts. To keep meat moist during cooking, consider using this liquid retention tactic.
Simplify with Trusted Resources
If you encounter issues like the slow cooker not heating properly or the meat turning out tough despite following these steps, consulting expert advice helps. For troubleshooting common problems like sealing or overheating, look into comprehensive guides on slow cooker troubleshooting and pressure cooker fixes. These resources provide clarity and remedies for a smooth cooking experience.Many home cooks operate under common myths about multicookers and slow cookers, but the truth is more nuanced than most realize. One widespread misconception is that setting these appliances to the highest temperature yields faster, better results. In reality, cranking up the heat can often lead to tougher meat, ruined textures, or even burnt food—precisely the opposite of what we aim for. For instance, many believe pressure cookers are only for fast meals, but mastering their low-pressure, slow-release methods can unlock deeper flavors and tenderness not achievable with quick pressurization. For an in-depth look, see [top pressure cooker tips for effortless meals](https://cookers.kitchentechhq.com/top-pressure-cooker-multicooker-tips-for-easy-one-pot-dinners).
Keep Your Cooker in Top Shape with These Practical Tools
To ensure your multicooker, pressure cooker, or slow cooker performs reliably over the years, investing in the right equipment and adopting proper maintenance routines is crucial. One of my favorites is a digital thermometer. I personally use the ThermoPro TP20, which provides instant, accurate readings during multi-stage cooking, helping me fine-tune temperatures and avoid overcooking delicate ingredients like fish or vegetables. Another key tool is a soft-bristled brush. It’s perfect for gently cleaning vent apertures and lids without scratching surfaces, maintaining the efficacy of sealing mechanisms. In my experience, these kinds of tools save time and prevent costly repairs down the line.
How do I maintain my multicooker over time?
Regular cleaning is the foundation of longevity. After each use, I recommend dismantling removable parts and soaking them in warm, soapy water. For the base, I use a damp microfiber cloth to gently wipe the surfaces and remove any residual food particles. For stubborn stains or burnt-on residue, a paste of baking soda and water applied with a non-abrasive pad works wonders—check out this detailed guide for step-by-step instructions. Maintaining seals and gaskets is equally important; applying a small amount of food-grade silicone lubricant keeps them flexible and ensures proper sealing, which is vital for pressure cooking safety.
Why Good Tools Can Extend Your Cooker’s Life
A high-quality pressure cooker seal set or replacement valve can be lifesavers. I keep a couple of spare gaskets and valves on hand; I’ve learned that using gasket replacements when needed prevents leaks that could damage the appliance or compromise safety. A well-maintained lid locking sensor is also crucial; sometimes, dirt or mineral buildup causes false warnings. Using a soft brush, I gently clear these areas monthly.
Future Trends in Cooker Maintenance
Looking ahead, I predict smart diagnostic features will become standard, alerting users proactively about wear-and-tear or mechanical issues. Already, some models incorporate IoT capabilities that allow remote monitoring and troubleshooting via smartphone apps. To prepare yourself, start exploring tools that interface with these smart features, like compatible cleaning kits or sensor calibrators. Staying ahead can save money and extend the lifespan of your investment.
Quick Tip: Upgrade Your Maintenance Routine Today
Next time you clean your cooker, try replacing old seals with new, high-quality gaskets. It’s a small upgrade that can dramatically improve performance and safety. Don’t wait for problems to arise—preventative care is the best strategy for keeping your cooker in top shape for years to come.

Lessons That Saved My Kitchen Nights
- One of the biggest revelations was realizing that patience and timing trump pre-heating or rushing. Starting with cold meat taught me that gradual heat allows collagen to melt beautifully, making tough cuts tender and flavorful, which previously seemed impossible.
- Skipping the temptation to peek often was a game-changer; each lift of the lid disrupted the delicate build-up of heat and moisture, prolonging cooking time and risking dryness. Trusting the process proved crucial.
- Understanding the science behind heat transfer in a slow cooker helped me troubleshoot issues faster. For example, knowing that starting cold requires longer cook times led me to adjust accordingly, avoiding guesswork.
- If I could do it all over, I’d focus more on choosing the right cuts—big, tough pieces that respond well to the cold-start technique—saving time and disappointment on smaller, leaner meats.
- Lastly, embracing the idea that tools are just as important as techniques opened my eyes to investing in quality seals and proper maintenance, which ensures consistent results and safety. The journey from skepticism to success was worth every lesson learned.
My Must-Have Gear for Perfecting Slow Cooking
- ThermoPro TP20 Digital Thermometer: Precise temperature control during long cooks helps prevent overcooking delicate parts and ensures collagen breakdown at just the right rate. I trust its accuracy daily.
- Gasket Replacement Kits: Keeping spares on hand for gaskets and valves has saved me from messy leaks and safety concerns. Make sure your seals are flexible and snug to avoid issues, especially when using the cold-start method.
- Soft-Bristled Cleaning Brushes: Regular maintenance keeps your lid and vents free from debris, ensuring airtight seals. A clean cooker performs better and lasts longer.
- Quality Cooking Utensils: Non-metallic tools prevent scratches and preserve the integrity of your cooker’s surfaces, especially during deep cleaning sessions with baking soda paste.
Time to Take Action and Elevate Your Slow Cooker Skills
Empowering yourself with the knowledge of the cold-start technique and proper tool maintenance transforms your approach to slow cooking. It’s about more than just recipes—it’s about understanding your appliance and working with its strengths. Imagine effortlessly achieving fall-apart tenderness with tougher cuts, saving money on premium meats, and impressing family with deeply flavorful meals. Your culinary future awaits, and these insights make the journey easier. Ready to embrace these game-changing methods in your kitchen? Start today, and let your slow cooker do the hard work while you enjoy the delicious rewards.
Have you ever struggled to get your slow-cooked meats tender? Share your experiences below—I’d love to hear your stories and tips!
,