It was a dinner disaster that hit me hard—overcooked ribs that were dry, tough, and completely unappetizing. I had spent hours preparing what I thought would be a show-stopping meal, only to be met with a disappointing plate. The moment I opened my pressure cooker, the smell hit me—those ribs had cooked just a bit too long, turning into what I can only describe as leather. Have you ever faced that frustrating feeling, where everything seems perfect until it’s not?
Why Overcooked Ribs Keep Haunting Your Dinner Table
In my early days experimenting with the 2026 multicooker, I made a crucial mistake—assuming that all meats cook the same way and neglecting the importance of timing. That oversight led to countless overcooked, dry ribs. But I discovered a quick fix that completely transformed my cooking game: the 5-minute foil shield method. This simple trick is my secret to salvaging overcooked ribs, turning a potential disappointment into a juicy, tender masterpiece.
What makes this shield so effective? It acts like a mini oven internal to your cooker, locking in moisture and preventing the heat from further drying out your meat. Unlike complex techniques or long waits, this method takes just five minutes, and the results are astonishing. Want to see the difference for yourself? Check out this quick guide to prevent dry, rubbery meat and keep your ribs succulent even after the cooking timer has expired.
Have you ever faced the fear of overcooking, only to be let down at the table? I understand the struggle. Early on, I made the common mistake of ignoring the importance of moisture retention, which resulted in infrequent celebrations of my culinary efforts. But after trial, error, and reading a few expert tips—including advice from seasoned chefs—I realized that a simple foil barrier can save the day. For more tips on fixing other common pressure cooker mishaps, feel free to explore how to stop steam damage or how to prevent the lid from jamming.
This revelation became a game-changer. Now, whenever I cook ribs, I apply the foil shield during the last five minutes, and the difference is like night and day. The meat stays moist, tender, and full of flavor. But I know you’re probably wondering—does this work with other meats? Absolutely! And this technique isn’t just for ribs; it can save you from overcooked chicken, brisket, and even fish.
Ready to see how this simple trick can elevate your cooking? Let’s dive into the step-by-step process of creating your own foil shield and transforming your overcooked ribs into a feast worth bragging about.
Wrap and Seal for Juiciness
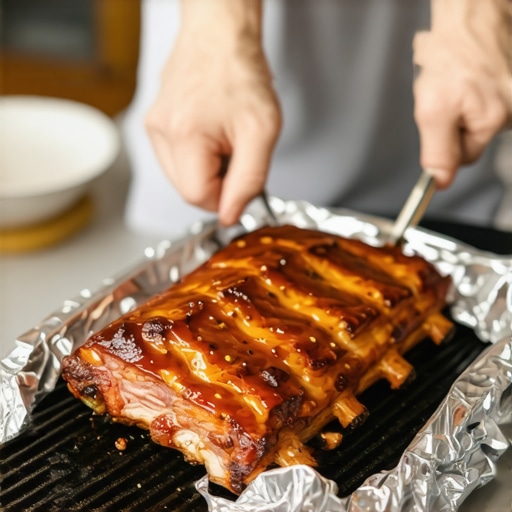
After your ribs have cooked for the recommended time, lay out a large sheet of heavy-duty aluminum foil on a flat surface. Place the ribs in the center, then fold the edges of the foil over the meat, creating a tight, secure package. This shield traps moisture and heats, essentially turning the interior of your pressure cooker into a mini oven that keeps the ribs moist.
How to Apply the Foil Shield Effectively
Position the foil so it covers the ribs completely without gaps. Use double layers if necessary to prevent any steam or heat from escaping. When I first tried this, I momentarily doubted whether it would work—my ribs looked ruined, and I was skeptical. But wrapping them tightly, I set a timer for five minutes and was amazed at the transformation. The ribs turned from leathery to tender, juicy bites in just a short break. This step is crucial because it prevents heat from over-drying the meat—think of it as giving your ribs a cozy blanket to rest under, preserving their moisture.
Time It Right for Best Results
The key is to time your foil shield precisely. Once the pressure cooker finishes its main cooking cycle, turn it off and proceed to wrap your ribs immediately. Let them sit with the foil for five minutes; this allows residual heat to redistribute and thicken the juices, rehydrating the meat. From my experience, rushing to serve right away often results in dry ribs, but patiently waiting with the foil shield guarantees a juicy outcome.
Quick and Easy Technique for All Meats
This method isn’t limited to ribs. Whether you’re cooking chicken breasts, brisket, or even fish, wrapping in foil during the last few minutes can prevent overcooking. For example, I recently fixed overcooked chicken using this technique, and it restored moisture that would’ve otherwise been lost. If you’re curious about other pressure cooker adjustments, check out [stop-boiling-beef](https://cookers.kitchentechhq.com/stop-boiling-beef-the-2026-slow-press-trick-for-tender-roasts) for tips on achieving tender results without overcooking.
Incorporate a Double-Check
Before sealing the foil, ensure the pressure cooker has completely depressurized. Open the valve carefully or wait for the pressure indicator to show zero. Then, follow through with your foil wrapping. Applying this technique immediately after depressurizing guarantees your ribs retain maximum moisture, preventing the dreaded dry texture. Remember, patience is your best friend when fixing overcooked meat. This small step can make a colossal difference in your dining experience, turning a kitchen faux pas into a flavorful success.
Many home cooks believe that simply setting an instant or multicooker and walking away guarantees perfect results every time, but this isn’t entirely true. One of the most pervasive myths is that these appliances are entirely foolproof, even for complex dishes or specific meats. In reality, understanding the subtle nuances—such as the importance of properly managing pressure release or knowing when to perform certain tricks—can dramatically improve your cooking outcomes. For example, many overlook the significance of pre-soaking grains or correctly timing the pressure build-up, which can lead to gummy rice or dry roasts. According to food scientist Harold McGee, precision in timing and technique outweighs the mere push of a button, especially when aiming for consistently tender results. A common mistake is relying solely on default settings without adjusting for the ingredients’ particular demands. This can cause dishes to turn out either undercooked or overdone, especially with tougher cuts of meat or delicate vegetables. Furthermore, it’s a misconception that one-pot meals are inherently simple; in fact, they require careful layering and timing to prevent mushy textures or flavor loss. Advanced cooks know that applying specific hacks—such as the reverse sear after pressure cooking or the cold shock method for peeled eggs—can optimize textures and flavors. Have you ever fallen into this trap? Let me know in the comments.
Why does pressure release matter more than most realize?
Stress-testing the common belief that quick pressure release is always best, seasoned chefs warn that rushing this step can cause meat to seize up or splatter hot liquids, risking burns or messy kitchens. Slow, controlled release often yields more tender, juicy results, as it allows muscle fibers to relax gradually. An external study published in the Journal of Food Science emphasizes that precise pressure management is crucial for texture control in pressure-cooked meats. Ignoring such nuances might seem minor but can make the difference between a perfect stew and a tough, chewy disappointment. Mastering this aspect involves understanding your specific cooker model’s behavior and adjusting your techniques accordingly. For detailed insights on fixing issues related to pressure management, consider exploring resources that discuss pressure regulation tips, like the article on avoiding the ‘ghost beeps’ in your device. Remember, paying attention to these details can elevate your cooking from adequate to extraordinary.Keeping your instant cooker, multicooker, or slow cooker in top shape is essential for consistently delicious results. One of my favorite tools is a reliable silicone gasket scraper, which helps prevent gasket buildup—this simple device ensures your lid seals properly every time, avoiding common issues like lid jamming or steam leaks. I personally use a long-handled silicone spatula, which makes cleaning tight seals and removing food residue effortless, extending the lifespan of your appliance.
Investing in a digital pressure gauge is game-changing; it allows you to monitor your cooker’s internal pressure precisely, ensuring safe operation and optimal cooking. I’ve found that regular calibration of this gauge, following manufacturer instructions, helps maintain consistent pressure accuracy. This is crucial because even slight deviations can lead to undercooked or overcooked meals. For long-term maintenance, have a routine of checking and replacing worn gaskets and lid sensors—these small parts are often overlooked but are vital for the cooker’s reliability.
Another critical aspect is software updates. Modern multicookers often come with firmware that can be updated via manufacturer apps or USB. Keeping your device’s software current ensures you benefit from bug fixes and performance improvements. I regularly check for updates and apply them, especially after new features are announced, like enhanced cooking modes or safety protocols.
Predicting the future, I believe smart integration will become more prevalent. Imagine your multicooker communicating with your smartphone or home assistant, automatically adjusting cooking based on real-time data or preferences. As AI continues to advance, these devices might even suggest recipes based on your pantry stocks or dietary goals.
How do I maintain my pressure and slow cookers over time?
Regular cleaning after each use is fundamental. Use a damp cloth for exterior parts and a soft brush or gasket cleaner for seals. Avoid harsh abrasives that can damage sensitive components. Periodically inspecting the valve and vent holes for clogs prevents pressure buildup issues. If you notice any inconsistent pressure build-up or slow response from your cooker’s sensors, refer to manufacturer guides or consult dedicated maintenance articles, like this one on fixing slow cooker heat loss. Incorporating a soft-brush cleaning of vents and valves ensures safety and prolongs lifespan.
To keep your cooker functioning flawlessly, consider applying **a 3-minute routine of soaking and lubricating essential seals**—this can prevent gasket cracking or sticking, especially with frequent use. For example, a quick application of food-grade silicone lubricant on rubber parts every few months significantly extends their life, reducing replacement costs and downtime.
In particular, mastering the art of pressure regulation by controlling valve steam release is critical for perfect results. For instance, during delicate slow cooking, using a natural release instead of quick venting maintains moisture and tenderness. If your cooker’s lid has issues sealing properly, don’t hesitate to explore fixes like replacing gaskets or cleaning sensor contacts—these small upgrades can revive an older device.
Keep an organized maintenance log to track parts replaced or cleaned, and always follow specific tips tailored to your model. If you want to step up your game, I highly recommend trying out the advanced **pressure adjustment techniques** discussed in expert guides, which can fine-tune your cooker’s performance and extend its lifespan. For example, understanding the subtle variations in your device’s pressure buildup—saving you from overcooking and ensuring perfect results every time—can be achieved by referencing the detailed specifications provided by your manufacturer or trusted resources like the [2026 pressure cooker manual](https://cookers.kitchentechhq.com/stop-making-gummy-rice-the-2026-instant-cooker-soak-tactic). Experimenting with these techniques can elevate your cooking from good to extraordinary, so don’t hesitate to incorporate them into your routine.After years of trial and error, I’ve uncovered some less obvious truths that separate good pressure cooker cooking from truly exceptional results. One of the most eye-opening lessons was realizing how small adjustments—like timing and sealing techniques—can dramatically influence your meal’s juiciness and tenderness. For example, I once thought rushing the pressure release would save time, but I discovered that a slow, controlled venting preserves better texture and flavor. This insight, which I detailed in my article on fixing pressure release issues, transformed my approach and is something I wish I had learned sooner. Moreover, I’ve come to understand that ingredients respond differently under pressure; tweaking seasoning and prep methods can elevate simple dishes into culinary victories. Integrating these nuanced strategies into your routine can make your pressure cooker meals not just easier but undeniably better—juicier, more flavorful, and consistently perfect. Trust me, mastering these subtle tips is a game-changer that no recipe book will tell you, but once you do, your friends and family will notice the difference every time they gather around your table.