Ever experienced that sinking feeling when you open the lid of your pressure cooker and find your perfectly planned meal has turned into a dry, disappointing mess? I’ve been there. The first few times I thought I was doing everything right — setting the correct time, using the right pressure, following the recipe — only to end up with tough, dry meat staring back at me. It was frustrating, especially after investing so much effort and anticipation into a simple, one-pot dinner.
The Lightbulb Moment: When Dry Meat Becomes a Meal Turnoff
One evening, I was craving my grandma’s braised beef, tender and juicy like it used to be. I followed the recipe to a T, but when I opened the pressure cooker, the meat looked and felt like jerky. That day, I finally realized that even small mistakes, like overcooking or not adding enough liquid, could dry out the meat faster than you can say “pressure cooker magic.” It was a moment of clarity — my technique needed an upgrade, not just patience.
This experience pushed me to dig deeper into the art of pressure cooking. Over time, I discovered that a few simple tricks could turn your tough, dry meat into a juicy, flavorful masterpiece. Today, I want to share these fixes with you so you can avoid the same pitfalls and enjoy foolproof, succulent meals every time you use your pressure cooker.
Is Pressure Cooking Really That Hard to Master?
Early on, I made the mistake of thinking that pressure cooking was all about time. But I quickly learned that it’s a delicate balance—too much heat, too little liquid, or overcooking can all lead to dry results. For example, I once skipped the step of balancing the pressure and realized it affected the moisture content. Trust me, it’s worth paying attention to these nuances. Want to learn how to turn this around? Check out this ultimate guide for pro tips on pressure cookers that will make your meals consistently juicy and delicious.
Now, let’s dive into the four easy fixes that can save your next pressure-cooked meat from dryness, so you can enjoy tender, flavorful dinners every time.
Stay Tuned for Simple Fixes to Juiciness
Ensure Adequate Liquid During Pressure Cooking
When I first tried cooking beef stew in my pressure cooker, I underestimated the importance of enough liquid. I only added a cup of broth, thinking it would suffice. As a result, the meat came out dry and tough. To fix this, always add at least 1.5 to 2 cups of liquid per pound of meat. This creates the steam needed for proper pressure and keeps the meat moist. Think of it like filling a shower with water: too little, and you get a dry spray; enough, and you get a steady flow. For more tips, check out this pressure cooker guide.
Control the Cooking Time Precisely
I once left a roast for 25 minutes, thinking more is better. The result? Overcooked, dry meat. The key is knowing the exact time required—usually 15-20 minutes per pound for tougher cuts. Use a timer and avoid opening the lid early. Remember, once the cooking cycle ends, allow a natural pressure release for 10 minutes; sudden release can dry out meat, as the rapid shift causes moisture loss. Applying this method transformed my dry roast into mouthwatering tenderness.
Properly Sear and Brown Your Meat
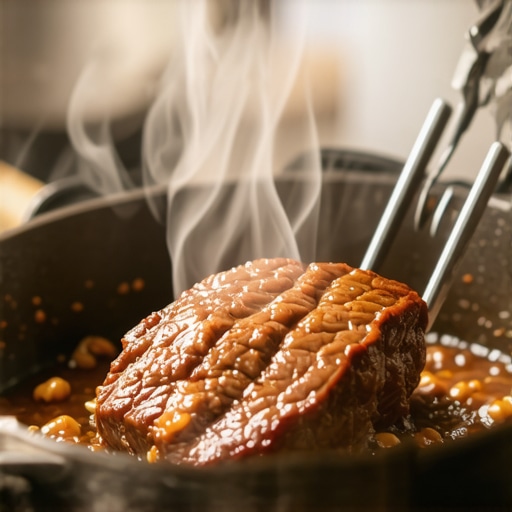
Before pressure cooking, I now sear my meat in hot oil until browned. This step locks in juices and adds flavor. I used to skip this, and my dishes lacked depth. Searing is quick—just 3-4 minutes per side in a hot pan—and makes a noticeable difference. Think of it like sealing a letter; it keeps the moisture inside. For detailed techniques, see this article on pressure cooker tips.
Maintain Proper Pressure Levels
A common mistake is not adjusting the pressure setting for different meats. Too high, and moisture escapes; too low, and the meat won’t cook evenly. I once left the lid slightly ajar, losing pressure midway. Now, I ensure my lid aligns perfectly and the valve is set correctly—high pressure for tough cuts, medium for delicate meats. This control preserves moisture, resulting in tender, juicy meat every time.
Use Natural Pressure Release for Juices
Quickly releasing pressure after cooking often dries out meat, as steam escapes rapidly. Instead, I turn off the heat and let the pressure decrease naturally—usually 10-15 minutes. During this time, the juices redistribute within the meat, keeping it moist. I remember trying to save time, but the jerky-like outcome proved otherwise. Patience here pays off, turning dry results into succulently tender bites.
Wrap or Rest the Meat Post-Cooking
Once pressure is released, I avoid slicing immediately. Instead, I let the meat rest for 5-10 minutes wrapped loosely in foil. This allows juices to reabsorb, preventing them from seeping out when cut. A quick story: I once sliced my brisket immediately, and it was dry as cardboard. Resting made all the difference, similar to letting a loaf of bread cool before slicing. For more techniques, visit this pressure cooker guide.
Many home cooks believe that selecting the right pressure cooker or multicooker setting guarantees perfect meals every time, but in my experience, this is a common misconception. One prevalent mistake is assuming that bulk cooking automatically leads to better flavor or texture—however, nuances like ingredient layering, timing, and pressure levels are critical. For example, rushing through the searing step to save time can drastically diminish flavor depth, as experts agree that proper caramelization enhances taste profiles significantly (see here). Another misconception is that using the highest pressure setting is always best; in reality, high pressure can dry out delicate proteins if not carefully managed, which many overlook. A common trap is the belief that all one-pot meals are forgiving and flexible—the truth is, overfilling your cooker or neglecting the natural release process can result in dry, tough meat or undercooked rice. An advanced question many cooks ask is how to optimize texture when cooking multiple ingredients with different cook times. The secret lies in strategic ingredient layering and selective pre-cooking, such as sautéing tougher vegetables first and adding delicate items later (more tips here). This approach requires understanding that pressure cooking isn’t a one-size-fits-all process; instead, it’s about fine-tuning variables for each dish. Remember, rushing or neglecting these subtleties can undermine even the best recipes—so, mastering your device’s nuances makes all the difference. Have you ever fallen into this trap? Let me know in the comments.
Tools That Keep Your Pressure Cooker in Top Shape
Having a reliable pressure cooker is just the beginning; maintaining it properly ensures consistent performance and delicious results. First, invest in a high-quality silicone sealing ring. I personally prefer the OEM rings from reputable brands because they maintain the right pressure and prevent steam leaks. Regularly inspecting and replacing these rings, every 12-18 months depending on usage, prevents hints of odors or leaks that can compromise your cooking. Check out this comprehensive guide for detailed maintenance tips.
Next, keep a pressure cooker brush handy. I use a small brass-bristled brush to scrub the valves and lid gasket groove, removing food debris that can interfere with pressure regulation. A dirty valve can cause uneven pressure buildup, leading to dry or uneven cooking. Maintaining a clean valve system and following manufacturer instructions extends the lifespan of your cooker.
Adapting Tools for Long-Term Success
Consider a digital pressure and temperature monitor for precision control. When I started using a wireless thermometer connected to my smartphone, I realized how consistent temperature control significantly improved my results. These devices help prevent overcooking by alerting you when optimal temperatures are reached, especially useful when cooking delicate dishes like fish or tender veal.
Another useful tool is a pressure cooker lid stand. It keeps the lid securely upright without risking warping or damage, preserving the integrity of the gasket and valve system. This simple addition prevents accidental drops that could lead to costly repairs, saving you money in the long run.
Automating Maintenance with Modern Methods
If you’re tech-savvy, integrating smart reminders into your routine can make maintenance effortless. Set calendar alerts to replace seals or clean valves. Additionally, some advanced models come with diagnostic features or apps that monitor and notify you about potential issues before they become serious. Looking ahead, I predict that more pressure cookers will integrate IoT features, allowing real-time diagnostics and even predictive maintenance—making sure your device stays in prime condition without undue effort.
How do I maintain my pressure cooker over time?”
Regular inspections and proactive replacements of seals and valves are essential. Using proper tools like pressure cooker brushes and monitors helps prevent common issues such as leaks or uneven pressure. Following manufacturer instructions and scheduling routine maintenance ensures your cooker operates safely and efficiently season after season. For an in-depth resource, visit this detailed guide. Try incorporating a smart maintenance checklist into your routine, and you’ll keep your cooker humming for years of effortless, flavorful meals.
Reflecting on my cooking journey, I’ve realized that pressure cooking is as much an art as it is a science. My biggest breakthrough came when I stopped chasing perfect times and started paying attention to the subtle nuances—like the importance of layering ingredients correctly and understanding how natural pressure release preserves moisture. Those small tweaks transformed my dry, tough meats into fall-apart delicacies, making me appreciate the complexity behind seemingly simple recipes.
Another lesson I wish I had embraced earlier is the significance of equipment maintenance. A well-kept pressure cooker isn’t just about safety; it’s about consistency. Regularly replacing seals, cleaning valves, and monitoring pressure levels ensure every meal turns out just right, saving me from frustrating dry outcomes and unexpected leaks. Trust me, high-quality tools and diligent upkeep are investments that pay off in every delicious bite.
Lastly, I’ve learned to listen to my instincts. While recipes provide a great starting point, adjusting for altitude, ingredient freshness, and personal taste makes all the difference. Sometimes, a little extra broth or a few extra minutes of natural release can elevate a dish from good to exceptional. Cooking with patience and attention turns pressure-cooked meals into memorable dining experiences I look forward to sharing with loved ones.
The Hidden Lessons That Changed My Approach to One-Pot Success
- Sealing in the Juices: Proper browning and layering deliver deeper flavor and moisture, proving that your initial steps matter just as much as the final timing.
- Listening to the Cooker: Observing how your specific device responds—like adjusting pressure settings—can vastly improve results, especially with delicate meats.
- Patience Over Speed: Embracing natural pressure release ensures tender, moist meat that remains juicy, instead of risking dryness with quick depressurizing.
- Tools Make a Difference: Maintaining quality seals and valves, along with using accurate thermometers, turns good pressure cooking into a reliable, hands-free experience every time.
- Learning from Experience: Each mistake, like overcooking or under-liquid, reveals what to tweak next, building your confidence and skill over time.
My Recommended Resources for pressure cooking mastery
- This ultimate pressure cooker guide: It offers comprehensive insights into pressure levels, timing, and maintenance tips that I’ve personally found invaluable.
- Top-rated pressure cooker accessories: Investing in quality seals, valves, and thermometers has transformed my cooking and prolonged my equipment’s lifespan.
- Specialized cookbooks and blogs: They inspire new recipes and techniques, pushing me to experiment and refine my skills continually.
- Online communities and forums: Connecting with fellow enthusiasts keeps me motivated, provides solutions to common issues, and sparks new ideas for delicious, moist dishes.
Your chance to create memorable, juicy dishes starts today
Armed with these personal lessons and reliable resources, you’re well on your way to consistently achieving tender, flavorful results with your pressure cooker. Embrace the journey—each mistake is simply a stepping stone toward mastery. Now, it’s your turn to turn dry disappointments into succulent success stories. Don’t wait for perfect conditions; start experimenting and refining your technique today. The satisfaction of serving perfectly cooked one-pot meals will make every effort worthwhile.
What’s the most valuable pressure cooking tip you’ve learned so far? Share your insights below and join the conversation on perfecting juicy, tender meals every time!
,
Reading this post really resonated with my own frustrations with pressure-cooked meats turning out dry despite following recipes carefully. One thing I’ve learned through trial and error is that the proper natural pressure release is crucial—not just for moisture retention but also for flavor development. I used to rush the process thinking it saved time, but I ended up with tough results more often than not. Now, I always let my pressure cooker release pressure naturally, especially for larger cuts of meat like brisket or pork shoulder. It does require patience, but the juicy, fall-apart texture I get makes it worth it.
I’m also curious, how do others handle timing when cooking different types of meat in the same dish? Do you find it better to cook everything together or pre-cook tougher ingredients and add delicate ones later? I’d love to hear your strategies for balancing flavor and moisture in complex one-pot recipes.