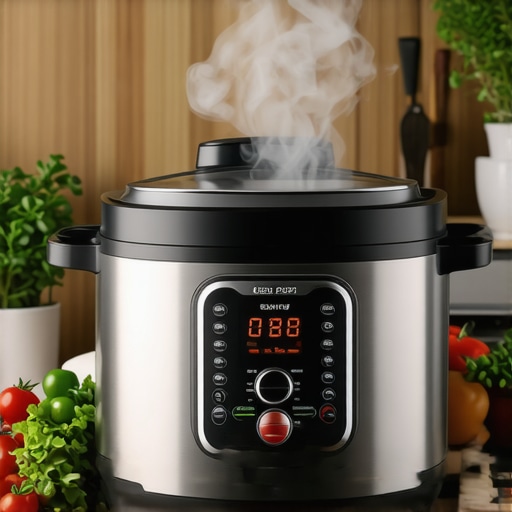
I remember the first time I tried to make a simple stew using my multicooker. I was so eager, yet somehow, it turned into a kitchen disaster—overcooked meat, undercooked vegetables, and a huge mess to clean. It was a lightbulb moment for me. I realized I was missing some crucial insider tips that could have saved me hours of frustration. Since then, I’ve been on a mission to uncover the best multicooker tricks to turn one-pot meals into effortless, delicious dinners. If you’ve ever felt overwhelmed by the sheer number of functions or unsure about how to get consistent results, you’re not alone. That’s exactly why I want to share my hard-earned knowledge.
Why Top Multicooker Tips Matter More Than Ever in 2024
In today’s busy world, the ability to whip up quick, tasty, and nutritious dinners without a mountain of dishes is a game-changer. Multicookers—whether they’re pressure, slow, or combo models—are more popular than ever. According to a recent survey, over 70% of home cooks now own a multicooker, and many rely on it daily. But here’s the catch: even the most advanced appliance can be tricky without the right techniques. I’ve learned that mastering a few key tips can make all the difference between a dinner success and a kitchen nightmare.
What really saves me is understanding how to control the cooking process, avoid common pitfalls, and maximize the potential of my device. I used to think that all multicookers were just “set and forget.” Nope. There’s a bit of art and science involved. For example, I once overfilled my cooker, thinking more ingredients would make the dish better. Instead, I ended up with a mess that took ages to clean up. Early on, I made the mistake of ignoring the importance of layering ingredients properly—something I now know is essential for even cooking and rich flavors. If you want to avoid my rookie mistakes, I suggest diving into the top tips and tricks that can transform your meal prep.
Is a Multicooker Actually Worth the Hype?
You might be skeptical—after all, with so many gadgets promising “easy cooking,” how do you know which ones really deliver? I was too. I used to think I could get by with just a slow cooker or a basic rice cooker. But once I discovered how a well-optimized multicooker could handle everything from tender roasts to steaming veggies, I was sold. The secret lies in understanding the device’s capabilities and applying expert hacks. For instance, I learned that sealing the lid properly and adjusting pressure settings can make or break your meal. Early on, I overused the default settings without considering the specific needs of each dish, which led to uneven results. Once I started exploring resources like this comprehensive guide, I gained a whole new perspective on how to get perfect meals every time.
So, if you’re ready to cut down on cooking time, reduce cleanup, and serve up restaurant-quality dishes at home, stay tuned. I’ll walk you through the top tips that will make your multicooker your new best friend—and turn you into a one-pot meal pro in 2024.
Start with Proper Ingredient Layering
My first attempt at making a beef stew in my multicooker ended with overcooked meat and bland vegetables. I realized that how I layered ingredients mattered. Place harder vegetables like carrots and potatoes at the bottom, closer to the heat source, and delicate items like greens or seafood on top. This ensures even cooking and prevents delicate ingredients from turning to mush. For example, during a chili night, I layered beans and meat at the bottom, then added spices, and finally topped with chopped onions and cilantro. This simple step made my chili consistently flavorful and perfectly cooked. If you’re unsure about layering, check out this guide for detailed tips.
Use the Right Liquid Ratios
One of my biggest mistakes was overfilling my cooker with ingredients and not enough liquid. It resulted in burning or undercooked food. A good rule of thumb is to add enough liquid—broth, water, or sauce—to cover ingredients by at least one inch for most recipes. When I made a chicken and rice dish, I initially used too little broth, and the rice stuck to the bottom. After reading this resource, I learned the importance of liquid ratio, which helps generate steam, keep flavors moist, and ensure even heat distribution. Adjust the amount based on your specific dish and cooker size.
Master Pressure and Temperature Settings
My breakthrough came when I realized that different dishes need different pressure levels and cooking times. For instance, tough cuts of meat like brisket benefit from high pressure, while delicate fish cooks best at low pressure or pressureless mode. I once cooked a roast at the default pressure for too long, ending up with shredded meat instead of slices. By referring to this guide, I learned to customize pressure and time settings. Always check your recipe’s suggested settings and don’t be afraid to experiment with shorter times or different pressure levels to avoid overcooking.
Control the Release of Pressure
Quick pressure release versus natural release can make a big difference. I once released the pressure immediately after cooking a delicate cheesecake, causing cracks. Now, I let it sit for 10-15 minutes before releasing pressure naturally, which results in a smoother texture. For meals like stews and soups, natural release helps flavors meld. For quick-cooking dishes, quick release saves time. Learn when to use each method by reviewing this detailed guide.
Embrace the Art of Timing
Timing is everything. I once left a pot of beans on high pressure for an hour, and they turned into a mushy mess. Now, I set precise timers based on the recipe and my cooker’s efficiency. Using a timer function or setting a reminder helps prevent overcooking. For example, I cook beef stew on high pressure for 35 minutes, then allow natural release for 10 minutes—perfectly tender meat with intact vegetables. For quick weeknight dinners, I rely on pressure cooker hacks that optimize both time and texture.
Practice and Adjust
Every cooker is different, and ingredients vary. My advice is to keep notes on times, liquids, and settings that work best for your favorite recipes. Don’t be discouraged by initial failures—they’re part of the learning process. With each attempt, you’ll develop an intuition for when to tweak the process. Remember, mastering your multicooker transforms cooking from a chore to a joy, making effortless, delicious one-pot meals a routine. For more detailed insights, explore this comprehensive resource to refine your technique.
Many home cooks believe they fully understand how to use pressure cookers, slow cookers, and multicookers, but in reality, there are subtle nuances and common misconceptions that can trip you up. Let’s dig deeper into what most people get wrong and how mastering these details can elevate your one-pot meal game.
Why the Popular Belief That All Settings Are Equal Is Wrong
One of the biggest myths is that default or preset settings on your device will always deliver perfect results. In my experience, relying solely on these presets without adjusting for the specific ingredients or recipe nuances often leads to overcooked or undercooked dishes. For instance, many assume that setting the pressure to ‘high’ guarantees tender meat, but the cooking time and ingredient size matter just as much. Fine-tuning these variables is essential for consistent success. Check out this guide for advanced hacks that can help you customize pressure levels effectively.
Beware the Trap of Overfilling and Layering Mistakes
Another common oops is overfilling the cooker or improperly layering ingredients. Many think that more ingredients mean more flavor, but overstuffing can block steam circulation, leading to uneven cooking and potential safety hazards. Proper layering isn’t just about aesthetic; it’s about ensuring even heat distribution. For example, placing denser vegetables at the bottom and delicate greens on top can prevent mushiness and flavor loss. This is a nuanced technique that separates the seasoned home chef from the beginner. For detailed tips, see this resource.
How Pressure Release Timing Can Make or Break Your Meal
Many underestimate the importance of pressure release methods. Quick release might seem faster, but for certain dishes like stews or desserts, natural release allows flavors to meld and textures to set properly. I once released pressure immediately after cooking a cheesecake, which caused cracks—lesson learned! Timing your pressure release based on the dish is a subtle but crucial skill. Read this guide for mastering pressure release techniques.
Are You Cooking at the Right Temperature and Time?
It might sound obvious, but many cooks don’t adjust cooking times and temperatures for different ingredients or sizes. For example, a brisket requires longer high-pressure cooking than chicken breasts. Overcooking tough cuts or undercooking fish is a common mistake that ruins the dish. Experimenting with time adjustments, and keeping notes on what works best, is key to becoming an advanced cook. For expert insights on this, explore this resource.
Have you ever fallen into this trap? Let me know in the comments. Mastering these nuances transforms your kitchen from a place of guesswork into a laboratory of delicious experimentation. Remember, the devil is in the details, and with a little extra attention, your one-pot meals will be consistently impressive.
Keeping your pressure cooker, slow cooker, or multicooker in top shape requires a combination of proper maintenance, smart tool choices, and routine checks. I personally swear by a few specific tools and methods that have helped me extend the lifespan of my appliances and ensure consistently great results for my one-pot meals. Let me share what works for me and why I believe these are essential for any home cook committed to long-term success.
How do I maintain my pressure and slow cookers over time?
First and foremost, regular cleaning is non-negotiable. After each use, I disassemble removable parts like the lid, sealing ring, and inner pot, and wash them with warm, soapy water. For the sealing ring, I inspect it for cracks or deformations—if I notice any damage, I replace it immediately. This is crucial because a damaged seal can compromise pressure accuracy and safety. I also wipe down the exterior with a damp cloth to keep dust and grease at bay.
Next, I ensure that the pressure release valves and vents are clear of debris. I do this with a soft brush or a toothpick, especially if I notice any sluggish pressure buildup. This routine prevents clogging that could cause inconsistent cooking or safety hazards. For the electronic components, I use a soft, dry cloth to avoid moisture damage, especially around control panels.
Tools I recommend for longevity and precision
One of my best investments has been a digital infrared thermometer. This tool helps me verify the actual temperature of the cooking surface, ensuring my appliance heats evenly and accurately. It’s especially useful when I’m experimenting with recipes that require precise temperature control, like delicate desserts or sous-vide style cooking in a multicooker.
Another essential is a silicone sealing ring replacement kit. I keep a few on hand so I can swap out the ring if it becomes odorous or deformed. This tiny upgrade can make a big difference in maintaining pressure integrity and preventing leaks.
For cleaning, I prefer a soft-bristled brush to clean vents and valves without damaging delicate parts. Additionally, a microfiber cloth is perfect for wiping down control panels and exterior surfaces without scratching.
Future trends and how to stay ahead
Looking ahead, I predict that smart, IoT-enabled multicookers will become more prevalent. These devices will offer diagnostic data, alert you to maintenance needs, and even suggest parts replacements proactively. Investing in high-quality tools now, like digital thermometers and replacement seals, positions you to adapt easily as these smarter appliances become mainstream.
If you haven’t already, I encourage you to try calibrating your cooker’s temperature with a digital infrared thermometer and replace aging sealing rings regularly. These small steps will ensure your appliances continue to perform at their best, turning routine maintenance into a simple part of your cooking routine. For more detailed maintenance tips, check out this comprehensive guide.
Lessons That Changed My Approach to One-Pot Cooking
- My biggest lightbulb moment was realizing that every ingredient’s placement impacts the final dish. I used to toss everything in randomly, but now I layer denser ingredients at the bottom and delicate ones on top, ensuring even cooking and richer flavors. This simple shift transformed my meals.
- I learned that not all pressure settings are created equal. High pressure doesn’t mean tender meat unless you also adjust the cooking time. Fine-tuning these variables has helped me consistently get perfect results, making me less reliant on default presets.
- The importance of patience with pressure release became clear when I cracked a perfect cheesecake by letting it cool naturally. Rushing the process can ruin even the best recipes. Natural pressure release often yields better flavor melds and textures.
- Using a digital infrared thermometer helped me understand my cooker’s actual temperature, leading to more precise adjustments. It’s a game-changer for delicate dishes where temperature accuracy is key.
Tools and Guides That Elevate My Cooking Game
- Ultimate Guide to Instant Slow Multicooker — This comprehensive resource helped me decode the device’s functions and optimize my cooking times and settings for every recipe.
- Top Pressure Cooker Multicooker Hacks — I trust this guide for customizing pressure levels and avoiding common mistakes like overfilling or improper layering.
- Essential Pressure Cooker Secrets — This book opened my eyes to the subtle art of pressure release timing and how it impacts meal textures.
- Multicooker Tips for Effortless Dinners — A must-read for quick adjustments and troubleshooting, making me more confident in my daily cooking.
Your Turn to Elevate Your Multicooker Skills
This journey into the secrets of multicooker mastery has been a game-changer for me. With these insights and resources, you can turn your kitchen into a one-pot meal haven and enjoy delicious, consistent results every time. Remember, the key is to embrace the details — layering, timing, and patience — and the results will speak for themselves. What’s the biggest challenge you face with your multicooker? Share your struggles below and let’s troubleshoot together!
Reading through this post really hit home for me because I used to struggle with overcooking my stews in the multicooker and ending up with a total mush. It’s only been in the past few months that I started paying closer attention to ingredient layering and the importance of liquid ratios. What’s fascinating is how small adjustments, like layering denser vegetables at the bottom or gradually adding liquids, can really change the outcome. I also found that experimenting with pressure levels and timing makes a huge difference, especially when cooking tougher cuts of meat. Have others here noticed a significant difference after adjusting their pressure or release methods? I’d love to hear what specific tweaks worked best for different types of dishes because I’m still fine-tuning my approach. Overall, mastering these techniques has definitely turned my frustrations into confidence in the kitchen. The tips in this post will surely help me improve even further.
This post really resonated with me, especially the part about ingredient layering. I used to toss everything into my multicooker and wonder why some parts cooked perfectly while others were a mess. Since I started paying attention to the layering technique—placing denser vegetables at the bottom and more delicate ingredients on top—the results have become so much better. I think it’s easy to overlook that even in a high-tech appliance, the physical placement of ingredients impacts cooking time and texture. I also experimented with reducing pressure during cooking, and I noticed that shorter cook times at high pressure help maintain the bite in tougher meats without turning them to shreds. Has anyone tried adjusting pressure levels for specific dishes like fish or seafood? I’d love to hear how others are customizing their settings to get that perfect doneness. It’s fascinating how small tweaks can really elevate our meals, isn’t it? Also, I found that taking notes after each cook has been super helpful in refining my process over time.