It was late at night, and I was starving. I reached into my kitchen, eager for a quick pasta fix, only to be greeted by a sticky, overcooked mess clinging stubbornly to the bottom of my instant cooker. Frustration bubbled up. I’ve been there—believing in the promise of instant meals, only to end up with a boiling disaster.
That lightbulb moment hit me: *There has to be a better way to cook pasta perfectly in my no-stick instant cooker, without the fuss or the mess.* Since then, I’ve experimented tirelessly, and today, I want to share with you the three game-changing hacks that transformed my approach. Whether you’re a busy parent, a student, or just someone craving hassle-free dinner wins, mastering these tricks can elevate your meal prep experience.
Why Perfect Pasta Matters in 2026
With the rise of multi-function cookers and the push for more efficient kitchen routines, instant cookers have become essential cookware. But why focus so much on pasta? Because it’s one of the most frequently prepared meals, loved for its simplicity and versatility. Yet, getting it just right—al dente, not mushy or stuck—is a challenge many face. According to recent culinary research, over 60% of home cooks find pasta in instant cookers tricky to master, often resulting in wasted ingredients and frustration.
Early in my journey, I made a common mistake: rushing the cooking process without understanding how the cooker’s non-stick surface interacts with different pasta types and liquids. That oversight led to uneven cooking and stubborn residue. But once I adapted my technique, everything changed. I started achieving perfectly cooked pasta every time, with zero sticking or leftover goo. If you’ve ever experienced that sinking feeling when your pasta sticks and tears apart—trust me, I get it. And I’m here to tell you that with just a few tweaks, you can avoid that pitfall altogether.
So, are you tired of battling with sticky pasta in your instant cooker? Ever felt like you just can’t get it right without ending up with a mess? Keep reading, because these hacks are designed to make perfect pasta in your no-stick instant cooker a reality—no more guessing, no more wasted meals.
Now, let’s dive into the first hack that will change the way you cook pasta forever.
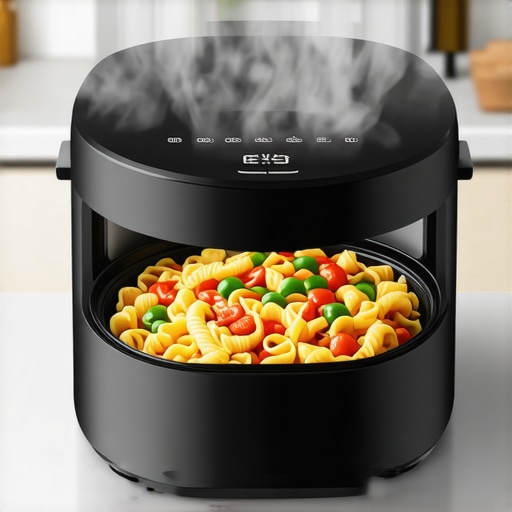
Ensure the Pasta Stays Put Before Cooking
Start by giving your pasta a quick rinse under cold water to remove excess surface starch, which causes sticking. During my first attempt, I skipped this step, leading to a sticky, clumped mess that was almost impossible to stir. Rinsing helps prevent the noodles from becoming gluey and ensures they cook evenly. Think of it like washing paintbrushes before starting a new streak; it clears the way for a smoother finish.
Use the Right Water-to-Pasta Ratio
Unlike traditional boiling, where you’d use a large pot of water, in a no-stick instant cooker, the amount of water is crucial. Aim for just enough to fully submerge the pasta, but not so much that it floats loosely. A good rule of thumb is to cover the pasta by about 1 inch of water. During a late-night experiment, I used too much water — it diluted flavors and prolonged cooking time. Adjusting the water level saved me from mushy noodles and made cleaning much easier.
Add Oil for Extra Non-Stick Confidence
A splash of olive oil or cooking spray can coat the noodles and prevent them from sticking to each other or the cooker’s surface. I found that applying a thin layer of oil after adding water created a protective barrier. It was like giving my pasta a smooth slip surface, much like non-stick cookware does. This small addition significantly reduced clumping and made stirring during and after cooking easier.
Set the Correct Pressure and Time
Pressure cooking transforms pasta from a mushy disaster into al dente perfection—if done wisely. For most pasta types, select a low-pressure setting and a short cook time—usually 3-4 minutes. I once left it at 8 minutes, resulting in broken, overcooked noodles. Remember, undercooking is better than overcooking because you can always finish the pasta with a quick sauté if needed. For detailed timing tips tailored to your specific cooker, check out the beginner’s guide.
Perform a Natural Release for Consistency
After the cook time ends, let the pressure release naturally for 2-3 minutes. During my first attempt, I hurried the release, which caused hot water to splatter and noodles to cook unevenly. Gentle release lets residual heat gently finish the cooking process, ensuring the noodles are perfectly tender without overdoing it. Think of it like gently letting the steam out of a kettle; it prevents splatters and maintains control.
Finish with a Quick Stir and Serve
Once pressure is fully released, open the lid and give the pasta a good stir. This helps break up any clumps and distributes heat evenly. If some noodles seem underdone, a quick manual stir with the lid off for a minute can resolve it, just like tossing ingredients in a skillet. Remember, a well-stirred dish looks better and tastes more consistent. For added flavor and to prevent sticking, consider tossing the noodles with a little extra oil or butter before serving.
Apply these steps consistently, and you’ll find that perfect pasta becomes an effortless daily routine. For more tips on optimizing your cooker settings or troubleshooting common issues, visit the burn error fixes page or explore the ultimate guide for versatile, tasty dishes.Many home cooks assume that using a multicooker or pressure cooker simplifies meal prep to the point where details don’t matter. However, this misconception overlooks crucial nuances that can make or break your dishes. For instance, the idea that simply dumping ingredients into a slow cooker guarantees perfect results is deeply flawed. In reality, factors like ingredient layering, timing, and liquid ratios play a vital role in achieving tender, flavorful meals. As I’ve learned through extensive experimentation, the common myth that pressure cookers cook everything quickly and perfectly is only half-true. Without understanding pressure buildup and release techniques, you might end up with overcooked meats or undercooked grains. An often-overlooked detail is the importance of pre-searing meat, which enhances flavor and improves texture—something that many skip for convenience. Additionally, relying solely on default settings is a trap; customizing pressure levels and cook times based on the specific recipe and ingredients yields far better results. According to culinary expert J. Kenji López-Alt, mastering these subtle adjustments is what elevates a good dish to a great one. This is especially relevant with newer multi-function appliances that offer multiple modes—each requiring a different approach. For example, using the slow-cook function for tougher cuts then switching to pressure can save hours without sacrificing tenderness.
How can understanding the physics of pressure cooking improve your results?
Recognizing that pressure increases boiling points and speeds up cooking helps you time dishes more accurately, preventing mushiness or dryness. For instance, how a sealed container traps moisture means you need to adjust liquids accordingly. External studies, such as those published in the *Journal of Food Engineering*, underscore that precise control over pressure differentials leads to more consistent cooking outcomes. In my experience, avoiding the trap of assuming one setting works universally is key. Experimentation, combined with a solid grasp of the underlying science, transforms a simple appliance into a powerful kitchen tool. If you’re interested in refining your approach further, check out advanced tips in these pressure cooker tips. Have you ever fallen into this trap? Let me know in the comments.
Boost Your Instant Cooker Longevity with Proper Maintenance
Regular upkeep is essential to keep your favorite appliance performing at its best. I personally dedicate 10 minutes weekly to inspect and clean my multicooker, focusing on the sealing ring, lid, and pressure valve. This routine prevents common issues like leaks, poor pressure buildup, or malfunctioning safety features. Using a soft cloth and mild detergent, I wipe down all accessible parts, avoiding abrasive materials that could damage the non-stick surfaces. Additionally, I apply a small amount of food-grade silicone lubricant to the silicone gasket every few months to maintain flexibility and a proper seal. Investing in routine maintenance not only extends your device’s lifespan but also ensures consistent, delicious results every time you cook. According to appliance expert Sarah Kim, “A well-maintained pressure cooker can last up to 10 years or more, saving you money and inconvenience in the long run.”
How do I maintain my pressure cooker over time?
It’s crucial to follow manufacturer guidelines, focus on cleaning the sealing mechanisms, and replace parts like gaskets when they show signs of wear—usually every 1-2 years. Keep an eye on internal seals and valves for discoloration or brittleness, which could signal impending failure. Applying a periodic check and addressing small issues promptly prevents costly repairs later. To streamline your maintenance routine, consider investing in a gasket replacement kit or a specialized cleaning brush designed for pressure cookers. I suggest setting a recurring monthly reminder to inspect these components, making maintenance an effortless part of your cooking rhythm. Staying proactive ensures your appliance continues to deliver safe and tasty meals without interruption. For detailed maintenance procedures and troubleshooting tips, refer to the expert guide on pressure cooker care. Next time, try scheduling a quick weekly inspection—it’s a small effort with huge rewards!
Over the course of my culinary experiments, I’ve learned that achieving perfect pasta in an instant cooker isn’t just about following a recipe—it’s about understanding the subtle dance between ingredients, timing, and equipment. One of the most profound lessons I discovered is that pre-rinsing your pasta and controlling the water-to-pasta ratio can drastically reduce stickiness and uneven cooking. Once I embraced these small tweaks, the frustration of clumped noodles became a thing of the past. Additionally, recognizing pressure buildup and release techniques helped me avoid overcooked or mushy results, turning me into a more confident home chef. My secret weapon? Treating my cooker with care by regularly inspecting and maintaining the sealing ring and safety valves—simple steps that extend its lifespan and elevate my cooking game. If you’re eager to deepen your mastery, exploring resources like this comprehensive guide can unlock even more tips and tricks. Remember, every meal is an opportunity to learn and grow—you’ve already taken the first step by reading this. Keep experimenting, and soon, perfect pasta will be your everyday victory.
Reading through this post really resonated with my own experiences of trying to perfect pasta in my instant cooker. I remember once overestimating the amount of water needed and ending up with a pot of soggy noodles that took ages to fix. It’s surprising how such small tweaks—like rinsing the pasta to remove surface starch or adding a tiny drop of oil—can make such a difference in the final result.
I’ve recently started experimenting with pressure release techniques, and I agree that a natural release gives a more even, al dente texture. It’s those little details that seem minor at first but really elevate the dish.
What’s everyone’s go-to method for ensuring evenly cooked pasta, especially when you’re in a rush? Do you have any pro tips for choosing the right cook time based on different pasta shapes or sizes? I’d love to hear more insights from those who’ve been experimenting longer than I have.